As a photographer or a retoucher, there is one commodity that is important above all others: your time. Setting aside your skills, creativity, and style, it is your time that is the intangible product your clients invest in.
Learning how to best manage your time is not only beneficial to your finances, but also for freeing up your schedule to enjoy a balance between work and play. Below we will review a series of tips to help you grab the proverbial clock by the hands and turn them to your advantage.
Know the Job Description
The first step to efficiency is to understand the task at hand. Approach every production as though you’re preparing to take on a new role at a new employer. Do your research! Get to know your client and what their expectations are for you as their photographer or as their retoucher. Ensure that you have confirmed the vital details such as: dimensions, expected turn-around-time, a revision period, and the deadline. Is the client using these images for print, or exclusively for web and social media? Each detail is important to know in order to prepare yourself for the journey ahead, like a road map for post-processing.
With the vital information squared away, the next step is to review your schedule. What other jobs are lined up in your pipeline? Keeping a calendar or a task-list is mission-critical to managing your time, as you have to be aware of the tasks that need to be accomplished.
However, in order to confidently judge your availability, you have to understand the time that will be required to accomplish the task. Review the job description, and evaluate the estimated amount of time that post-processing should take. If you haven’t already done so, time yourself while you retouch. There are a host of free online tools and apps, as well as digital stopwatches that can help you track the actual time a job takes. Comparing the actual cost (your time) versus the perceived cost can be eye-opening, and should serve as the basis of your time management assessment.
Find Your Organization System
There are several options for organizing your images. Adobe Lightroom and Phase One’s Capture One are arguably the two most popular applications for doing so. However, there are organizational options built into every computer, and various methods for proficient file management.
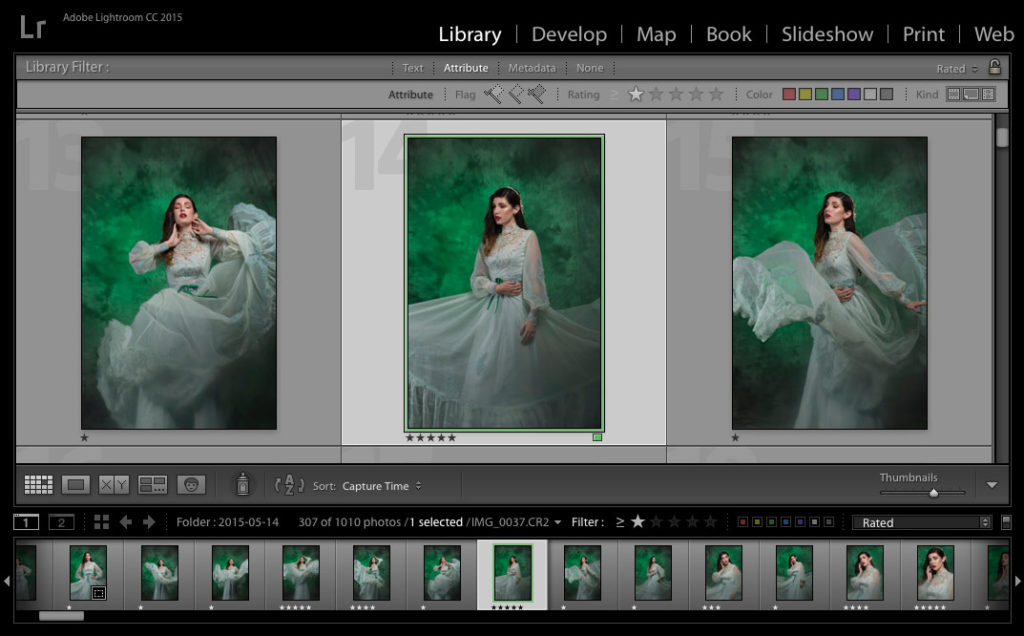
I personally use Adobe Lightroom, leveraging the ability to easily import, rate, flag, and label images. Regardless of the file management system you utilize, decide on how you intend to label your workflow. Do you flag the images that need to be edited? Do you apply a certain color label to alert you that basic clean up has been done, but not color grading? Do you use a certain rating to signify priority images? Regardless of how you plan to organize your work, it is vital that you stick to it. Your system should be easy for you to follow, as well as not be a time-consuming effort in and of itself. The easier it is for you to organize your work, the better!

Lightroom offers a host of organizational options.
Do The Heavy Lifting First
First and foremost, ensure that you have a proper canvas to work on. This can be accomplished through simple exposure adjustments and raw conversion in order for your photograph to be easily edited. If the image is too underexposed or too overexposed, there will be a lot of details that are lost during your retouching.
Once you have an enhanced canvas ready for retouching, I recommend beginning by removing any distractions or imperfections in the background of your image. The healing brush and clone stamp tool will likely be the most effective at accomplishing this task without consuming too much time.
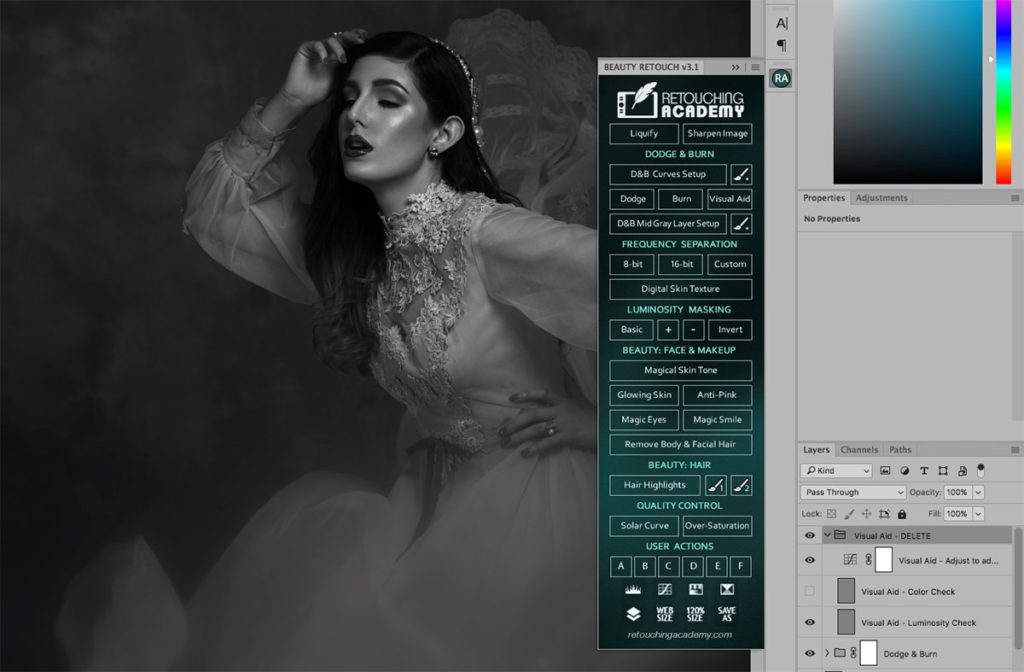
With distractions out of the way, you should now focus on retouching the skin and hair of your subject. Frequency separation is a popular method of accomplishing this task, by allowing you to correct texture inconsistencies while smoothing out tones. However, this method is often scrutinized for destroying skin texture due to overuse of blurring. Personally, I prefer to use a mix of the clone stamp tool, as well as performing local dodging and burning (made easy with the Beauty Retouch Panel). Regardless of your method, this will likely be the most labor-intensive portion of the image, and should employ a measure of patience. Skin and hair that is properly retouched can make all of the difference in the world. If you’re looking to vastly improve your skills with dodging and burning, we recommend checking out the Master Dodge & Burn Video Course by Michael Woloszynowicz.
After retouching skin and hair, the next step is to perform global dodging and burning to the image. Effective dodging and burning can really add a sense of dimension to your work, by allowing you to control the highlights and shadows that are present. Smooth transitions from light to dark can also aid in a more polished aesthetic, and has become a vital aspect of any beauty and fashion retouching workflow.
Wrapping up the more dramatic aspects of this part of your retouch, will be attention to shapes. The liquify tool should be used sparingly, along with other similar tools such as puppet warp or any of the transform tools, in order to correct the overall perspective or appearance of shapes. The key objective is to limit distortion while flattering your subject.

Using the Dodge & Burn Curves Setup with RA Retouch Panel.
Color Treatment & Lighting
After completing the heavy lifting on all of the images that are to be retouched, it is now time to color grade. You want this to be a step that is done toward the end of your post-processing, in order to guarantee consistency across the project. There are multiple methods for color grading, such as: selective color, gradient overlays, gradient maps, hue / saturation, and more. The key is to experiment with your blending modes, luminance, and saturation. Another great tutorial by Michael Woloszynowicz about mastering color grading is available in the RA Store.
In accompaniment with this step, you want to review the lighting of your images. An inconsistent exposure across a series of images can dilute their impact. Verify that the highlights, neutral tones, and shadows possess a uniformity in your final pieces.
Delivery
With your work completed, it is now time to send the preview images to your client for review. There are many options for delivering images, including services such as Dropbox, Format, Google Drive, Pixieset, and WeTransfer, to name a few. Regardless of your preference, keep several aspects in mind when displaying your finished work in front of your client. The interface on the client’s end needs to be easy for them to use. If it is not intuitive, then you run the risk of becoming your client’s technical support. Beyond a simple interface, you want your work to be displayed in the best light, so ensure that the service does not compress your files or render them in poor quality.
Clearly state the terms of your client’s revision period, so that they understand the available window of time for them to request any adjustments prior to delivery of the final product.
Time to Reflect
With another job concluded, it is vital for you to take a moment to review the actual time that went into the project. Did the time invested line up with the estimate? If the time had run over the allotted amount, be sure to pin down the causes. Reflect on the techniques you employed in your retouching, and consider if there are more effective methods for accomplishing the same tasks. Are there available Photoshop Actions or Plugins that can expedite certain aspects of your workflow?
What were your findings, and what are the adjustments you will make for the next project? Through your awareness of those pain points, you can now formulate a strategy for accelerating your next project. It is only through a drive for improvement that you can truly make progress in your work, and take control of your most valuable commodity.
Image Credits – Photo & Retouch: Kendra Paige | Model: Jade Antonie | Dress: Victory Vintage Boutique | MUAH: Ingrid Moncada | Stylist: Fallon Lueck-Arenaz
This article first appeared in [RE]TOUCHED Magazine, and has been updated as of this posting.


