This is the third part of the article by our guest Australian Commercial Digital Retoucher Peter Worthington.
Part I: The Importance of Layer Organization in Commercial Retouching – Part I
Part II: The Importance of Layer Organization in Product Retouching – Part II
Grouping Related Layers
You’re probably starting to get your head around where your individual layers are now and where you need to place certain elements. In the next step, I’m going to demonstrate how I group similar layers so I can progress to the stage of actual retouching and compositing.
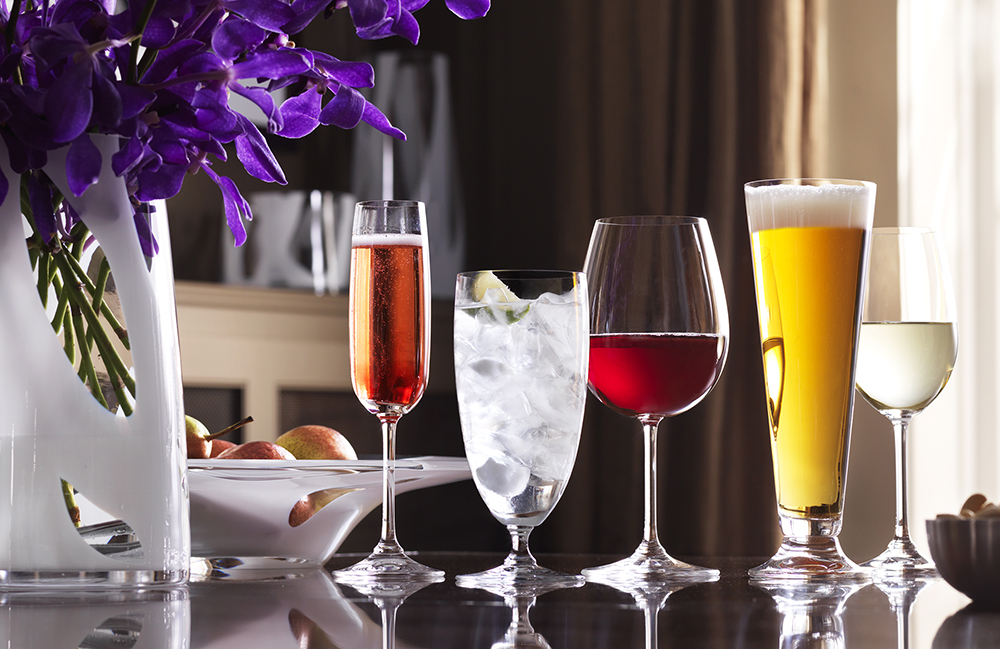
I’m going to use the glassware image as an example to show you how I group layers. For the purpose of this tutorial, I’ve selected a very simple image in terms of retouching, but one that is sufficiently complex that the photographer had to shoot numerous individual frames so I would be able to create the final product image out of composited elements.
For this particular brief, each of the glasses had separate capture files for the liquid and other components that needed to be placed in the hero image. As a result, the photographer shot only the glassware without liquids for the hero, knowing that I was going to be placing all those pieces in during retouching. I’m only going to focus on the beer glass in this tutorial so you can get a general idea of the basic compositing that is common in a lot of product retouching.
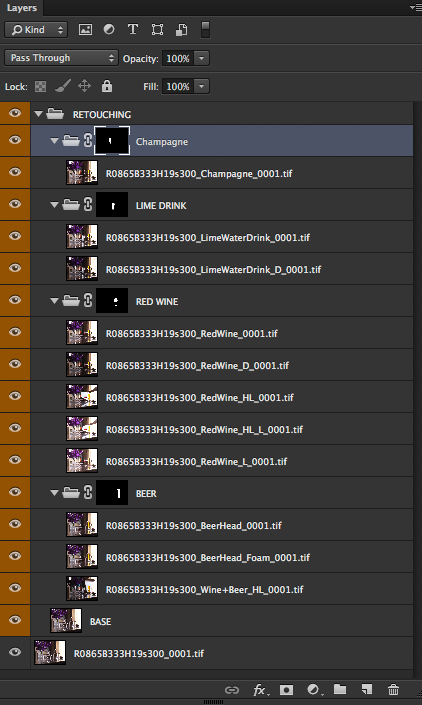
After setting up my file as previously described, I create a group, or subfolder, and include all of the frames captured by the photographer that relate to the beer glass and call it “BEER” (note that this subfolder stays inside my “RETOUCHING” folder). Next, I make a selection from my beer glass path (move the cursor over the path and hold down the Command key while clicking the path) and, making sure I have the “BEER” subfolder selected, I add a layer mask to “BEER” by clicking the “Add Layer Mask” button found at the bottom of the layers panel.
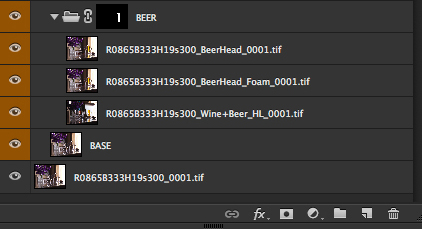
With my example image, the photographer supplied me with a capture for the liquid and one for the beer head. Since my layers are already in my masked “BEER” subfolder, I know that when I brush in these elements, they will stay within the bounds of the subfolder mask.
I start by brushing in the liquid on the layer mask, then move to the next layer and brush in the beer head. There’s a very good chance I will need a new blank layer on top of these individual parts to apply general heal/clone/airbrush cleanups.
For your own work, repeat this process as many times as you need, by creating more and more subfolders in your “RETOUCHING” folder. Don’t forget to clearly name your layers so you can find the folder quickly. Your layers panel will probably look something like this after you’ve repeated it enough times:
After you have grouped these layers and completed your retouching work, you will move on to colour grading your work file. I’ve found that when you start adding adjustment layers in different areas, it becomes more difficult to edit your image because layers start stacking up very quickly and things have a tendency to get messy.
In the final part of this tutorial, I’ll be discussing colour grading and adjustments layers:
The Importance of Layer Organization in Product Retouching – Part IV


