Instagram has changed the game for all visual artists looking to market their work. Millions of images are shared every day from all parts of the world vying to be seen. So what do you do to make your images not only look good on Instagram but also stand out from the rest?
RELATED: Exporting Images for Facebook, Instagram and Your Website from Photoshop
In this video Unmesh Dinda of PiXimperfect shares the six steps you can take in Photoshop to make your images pop on Instagram.
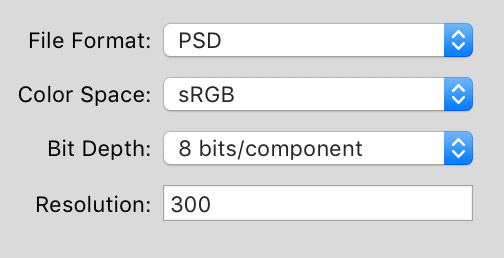
- In his first step, Unmesh shows how to import your photograph to Photoshop from Lightroom, and then he changes its Color Space and Bit Depth in Photoshop. You can also do all of that in one step by first changing Lightroom Preferences > External Editing for editing in Adobe Photoshop to PSD (file format), sRGB (Color Space), 8 bits/component (Bit Depth) and 300px (Resolution).
2. Unmesh also shares how he recommends viewing the image that is destined to be published on Instagram to make appropriate color grading choices;
3. How to properly crop it for the platform;
4. Before decreasing the size of the image to 1080px, we recommend saving a copy of the image in its original size, which Unmesh does not do in this tutorial.
5. There are several sharpening methods and you can stick with your favorite method or try the one recommended in this video. Just be gentle and don’t over-sharpen parts of your image to the point that they look “crispy” as it actually lowers its perceived quality;
6. The trick that Unmesh is sharing at the end of the video is pretty cool and makes uploading your images to Instagram so much faster and easier! If you are on Mac OS you can open Chrome’s Developer tools to toggle the view via View > Developer > Developer Tools, then click Toggle Device Toolbar.
Watch the video and start implementing some or all of these steps into your workflow!
Source: PiXimperfect | Featured Image: Photo & Retouch: Marta Machado | Makeup: @mariodiasmakeup | Hair: @cristinarodrigues_missme | Production: @marianarcouto @oliviarugani | Styling: @bycarolinafreitas | Model: @valtruphi



Unmesh suggested changing an image to 8 bit SRGB at the beginning. Is that not defeating the purpose of shooting in RAW and having the working space of either Adobe RGB 98 or Profoto RGB. If changing before any editing has been done then I might as well have the camera, Lightroom all set to 8 Bit SRGB from the start. Sorry I am a little confused.
Hi Kevin,
Files in 16 bit and ProfotoRGB or AdobeRGB98 are significantly larger than 8 bit sRGB, especially if you shoot on a newer pro DSLR camera. Yes, you get so many more colors, no banding, etc., but if everything you shoot for yourself and your clients ends up being used mainly on the web, you might as well begin by exporting in 8 bit and sRGB.
My clients use the work that I produce for them for both web and print and in my entire career as a commercial photographer I am yet to experience a situation in which my clients would say: “You know, we think there’s not enough colors in your images in our prints”, and I have been working in sRGB and 8 bit all along.
So, I guess my point is – if you feel more comfortable working in 16 bit and ProfotoRGB or AdobeRGB, keep doing that and ignore all suggestions to open your files in 8 bit and sRGB. It’s that simple 🙂