In this tutorial our guest Commercial Digital Retoucher Peter Worthington will walk us through his workflow and share the most effective ways of handling layers in your master files as you progress with a retouching job.
Peter is currently based out of Toronto, Canada. He’s been working commercially in the industry for over 12 years in Australia and Canada serving the global market. With a qualified background in commercial photography, he has worked with some of the elite award winning photographers in Sydney including Andreas Smetana, Geoff Lung and Petrina Hicks. For the last 6 years Peter has been working full time for international advertising agencies and M&C Saatchi, NYC:
Part II: The Importance of Layer Organization in Product Retouching – Part II
Part III: The Importance of Layer Organization in Product Retouching – Part III
Part IV: The Importance of Layer Organization in Product Retouching – Part IV
PW: There’s one thing I can’t stress enough when discussing work with other retouchers who take up a career in commercial retouching: Keep your layers organized.
The importance of doing so could make all the difference in meeting your deadline, pleasing the client, and building successful business relationships to acquire regular work and income. You could save a lot of time and stress when the client is standing over you, with the deadline looming, if you get yourself organized in advance.
Although this advice obviously applies to any type of retouching work, in product photography, a final image often requires the combination of many images that can quickly get out of control if you don’t plan ahead. This article will detail some general tips for navigating and structuring your layers to keep your work neat and tidy.
I first experienced just how crucial layer organisation can be quite early in my commercial retouching career when I was asked to fill in for a friend who was significantly more qualified than me at that stage, while he was on vacation. He worked at a high-end retouching firm in Sydney, Australia.
At the time, I still considered myself to be an intermediate level retoucher, and although I knew how to use Photoshop fairly well, I had little experience in dealing with large, complex layered files. Needless to say, I made a big mess of it and, shamefully, my work had to be handed over to someone else, who essentially started over from scratch. I went home with my tail between my legs thinking my career was over before it had begun.
Fortunately, things improved for me after spending a lot of time asking questions of my industry friends and learning how to correctly place layers so I could return to a file and edit it quickly. Everyone has different methods for organizing his or her work — and part of the joy of Photoshop is that you can do the same thing in ten different ways — but I will describe the method I use to keep my work neat and editable. So let’s get to it…
Every Retouching Job Will Be Different But You Need Your Routine
First, recognize that every photographer you work for will likely have a different style of shooting and will vary in what they decide to capture. When you work as a freelance retoucher, you soon learn that some photographers like to shoot a lot of different frames. Some photographers like to hand over the RAW files, while others will only give you processed files.
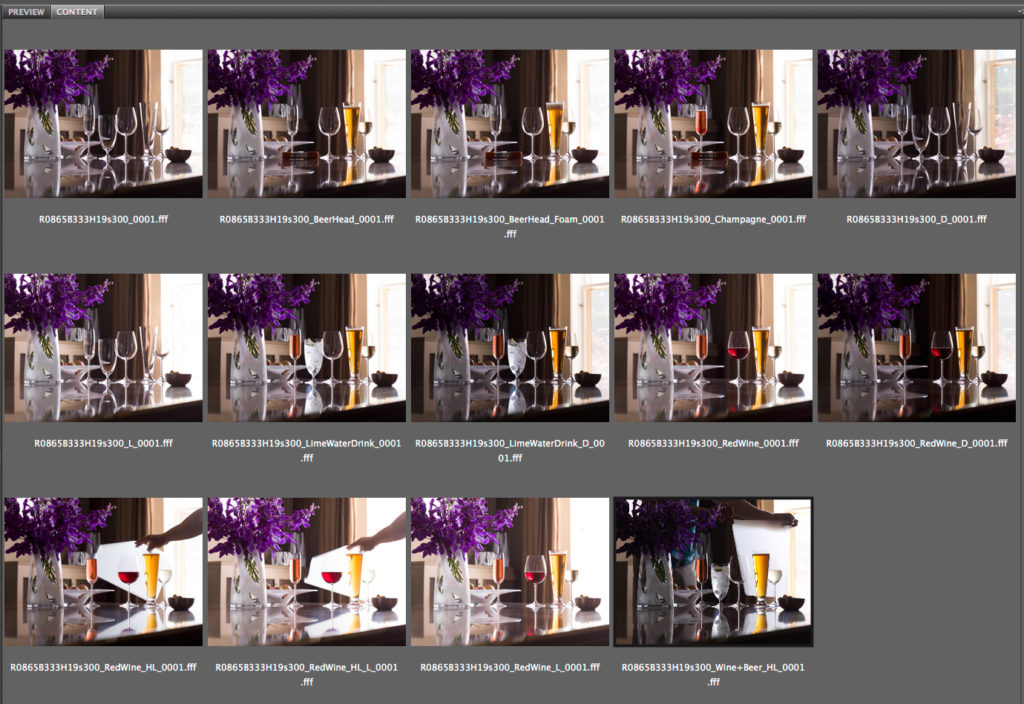
Regardless, the first step to keeping your work file neat and tidy is to open up Adobe Bridge or Lightroom and see all of the files in one place. Most photographers either name the individual files or provide notes corresponding to the image numbers to indicate which files they want you to use for each specific element of the finished work.
Click to enlarge:
In Bridge, select all of the image files that you will need, go to Tools > Photoshop > Load Files Into Photoshop Layers. This will create a layered work file in Adobe Photoshop with each image on a separate layer. You will now have the “hero” file to begin your organization and construction of the image.

You can take a similar approach if you prefer to use Adobe Lightroom. Select the files you wish to combine and go to Photo > Edit In > Open As Layers in Photoshop…
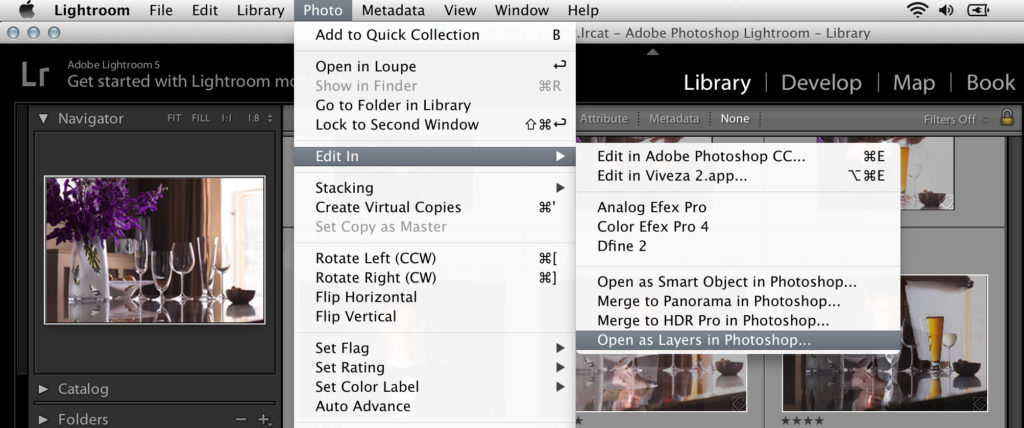
Editor’s tip: After selecting the files, you can also simply right-click on any selected image and choose Edit In>Open as Layers in Photoshop…
In Part II of this tutorial, we will look at where to go from here once you have all of your layers loaded into a single work file in Photoshop: The Importance of Layer Organization in Product Retouching – Part II.









For the last 6 years Peter has been working full time for international advertising agencies Saatchi & Saatchi and M&C Saatchi, NYC. http://clck.ru/9FMLh
Lets get organized.