
Felix Hernandez Rodriguez is a conceptual and commercial photographer and graphic designer from Cancun, Mexico. Today he shares his Guide to Toy Photography which is designed to help all enthusiasts in this genre create realistic images by using a few handy techniques, some plastic toys and a bit of imagination.
I remember when I was a kid I used to spend hours alone in my room playing with my toys. I also remember that the best part was creating an environment for them and “weathering” them to match the scene in my head. Toys painted as if they just fell in mud because of the rush of the battle; burned toys, wet toys, beds turned into deserts, wardrobes into mountains, rugs into seas, boxes and chairs into castles… Imagination had no limits.
Now that I’m a “grown-up”, I realize that I never stopped playing and that the only difference is that now I have a camera in my hands. Photography and digital art just gave me the possibility to recreate the scenes I’ve had in my mind since I was little, to bring them alive.
Toy photography is not so different from other kinds of photography but it has some great advantages like having your “models” on hand any time of the day or night you need them! If I want a plane, a dinosaur or a Ferrari… I just grab them from a box or my kids’ room (with their permission of course). If I need a winter or a desert scene I just have to go to the kitchen for some ingredients! (you will also need a proper permission for that).
Toy photography has its own particularities and that’s mainly because of the scale. Here are some elements that must be taken into consideration:
Scale:
Scale is one of the most important elements of toy photography. If your goal is to give your scaled models (toys) the sense of “realism”, you will need to get close to them with your camera. You would think that using a macro lens would do the job, but the problem with macro lenses is that they have a shallow depth of field. This means that you will only have focus in a small area of your subject and the rest of your subject and scene would be out of focus. That would be a downfall for our purpose in making them look “real” because of the way our brain has been taught to see the things in our human scale.
One solution for using a macro lens and achieving focus in all of our subject is to use the technique of “focus stacking”. Focus Stacking is a technique which requires you to take different shots of your subject, focusing from the very first plane (the closer part of the subject towards your lens) to the furthest plane of your subject and in between. In the end you will have an “X” amount of individual shots of all the planes of your subject in focus – individual images that you will process in software like Photoshop to get a final image with all it’s planes in focus.
There are different ways to do the focus staking in camera:
1) Your camera on a tripod and moving your focus ring manually for each shot.
2) Your camera on a tripod and moving your focus ring electronically for each shot. There is dedicated software for this.
3) Your camera on a tripod and a dedicated slider for macro photography. In this case you will move the camera towards your subject and not the focus ring.
4) Your camera on a tripod and a dedicated slider and software for macro photography that will do all the “fun” work for you.
I use the cheapest and simplest way – point number 1. I focus and mark the nearest focal plane on my lens, and then I do the same for the furthest focal plane. Then I know that I have to do an “x” amount of shots between the two marks to have all the subject in focus. The amount of shots you need will depend on the distance between your nearest and furthest focal planes… I normally do 30 shots for every 10 inches of distance.
Now, for converting all the shots into one final image I use Photoshop, no special plugin needed. Here are the steps:
1) Open Photoshop and go to: File / Scripts / Load Files Into Stack;
2) The “Load Layers” window will open. Browse and load all your individual images. Check the box of: “Attempt to Automatically Align Source Images” and hit the “Ok” button;
3) All your images will open in one single document each image in a layer;
4) Select all your layers in the layers panel;
5) With all the layers selected go to: Edit / Auto-Blend Layers;
6) The “Auto-Blend Layers” window will open. Select “Stack Images” and check the box “Seamless Tones and Colors”. Hit the “OK” button;
7) When the process of blending the images ends you will see at each side of your layers a new layer mask, which only reveals the parts of the image that are in focus;
8) Photoshop is not perfect so you will most likely have to unmask or mask areas that Photoshop may have missed. This part is time consuming and may require practice;
9) When you are done and you feel everything looks fine, you can merge or flatten all your layers.
Some important notes for scale:
• Focus stacking on camera can be done with any kind of lenses, it doesn’t necessarily have to be a macro lens;
• When your scene is too wide a macro lens won’t work well. Use a wide angle lens;
• I normally use a 24-105mm lens. The focal length that you choose will depend of your scene and composition;
• You don’t have to do focus stacking if your models (toys) are big enough and you are shooting with aperture number between f/11 and f/32.
Light:
I shoot my models in studio with studio lights. It could be similar to shooting a product, but again, if you want to give the sense of realism you have to think about the scale. Shooting a real human model with an octabox is not the same as shooting a “scaled model” with the same octabox. The quality of the light would be softer because it’s a huge modifier for a scaled model. So all the basics of lighting in studio will apply but take them to a smaller scale.
I normally shoot with a beauty dish and/or a snoot for the models and two more lights for the background if I want it white.

The Scene:
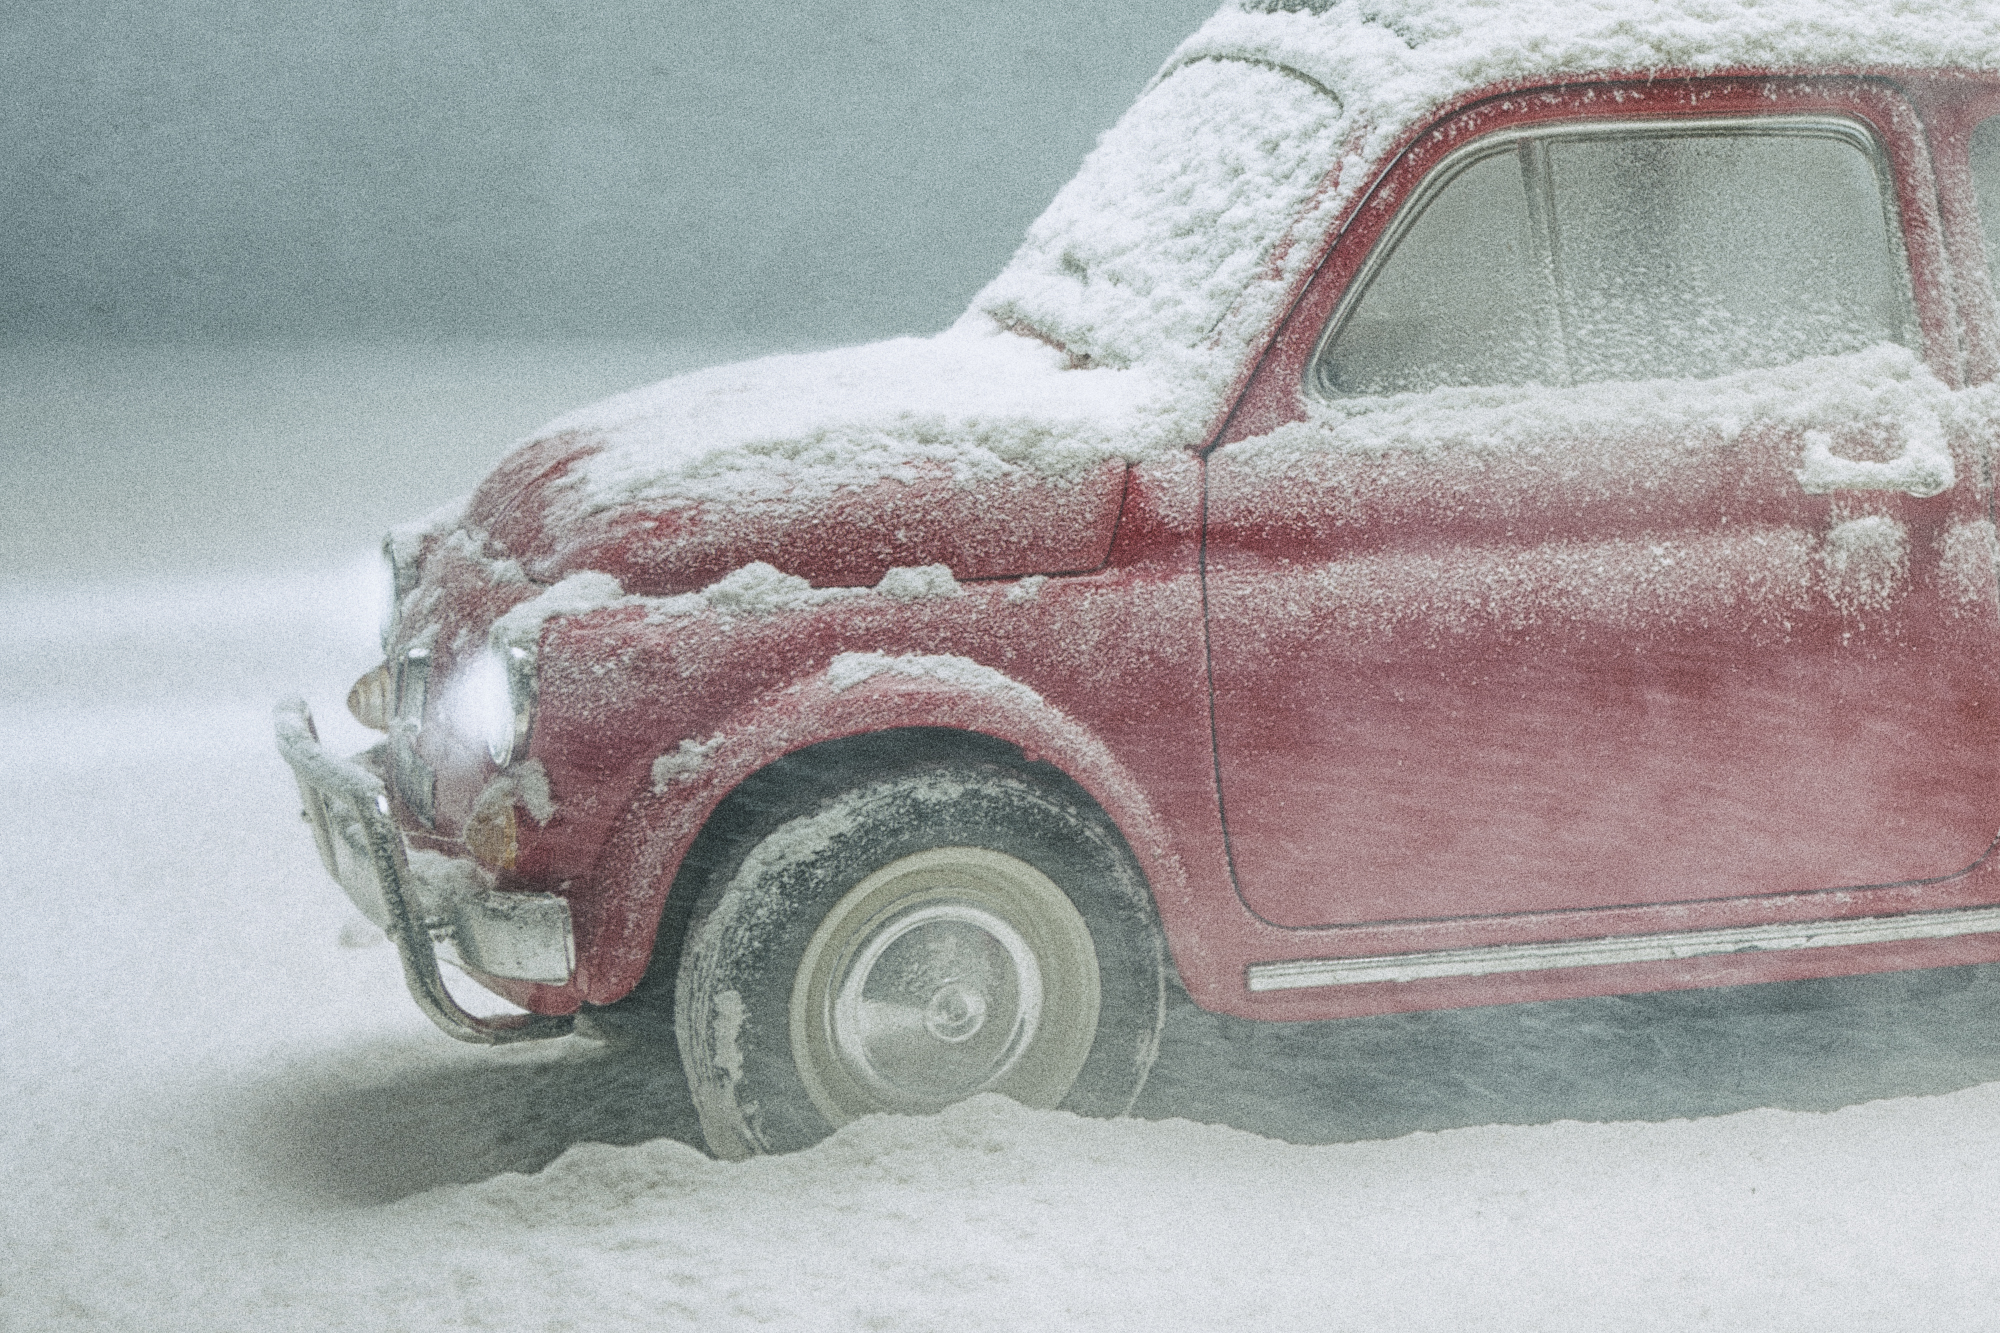
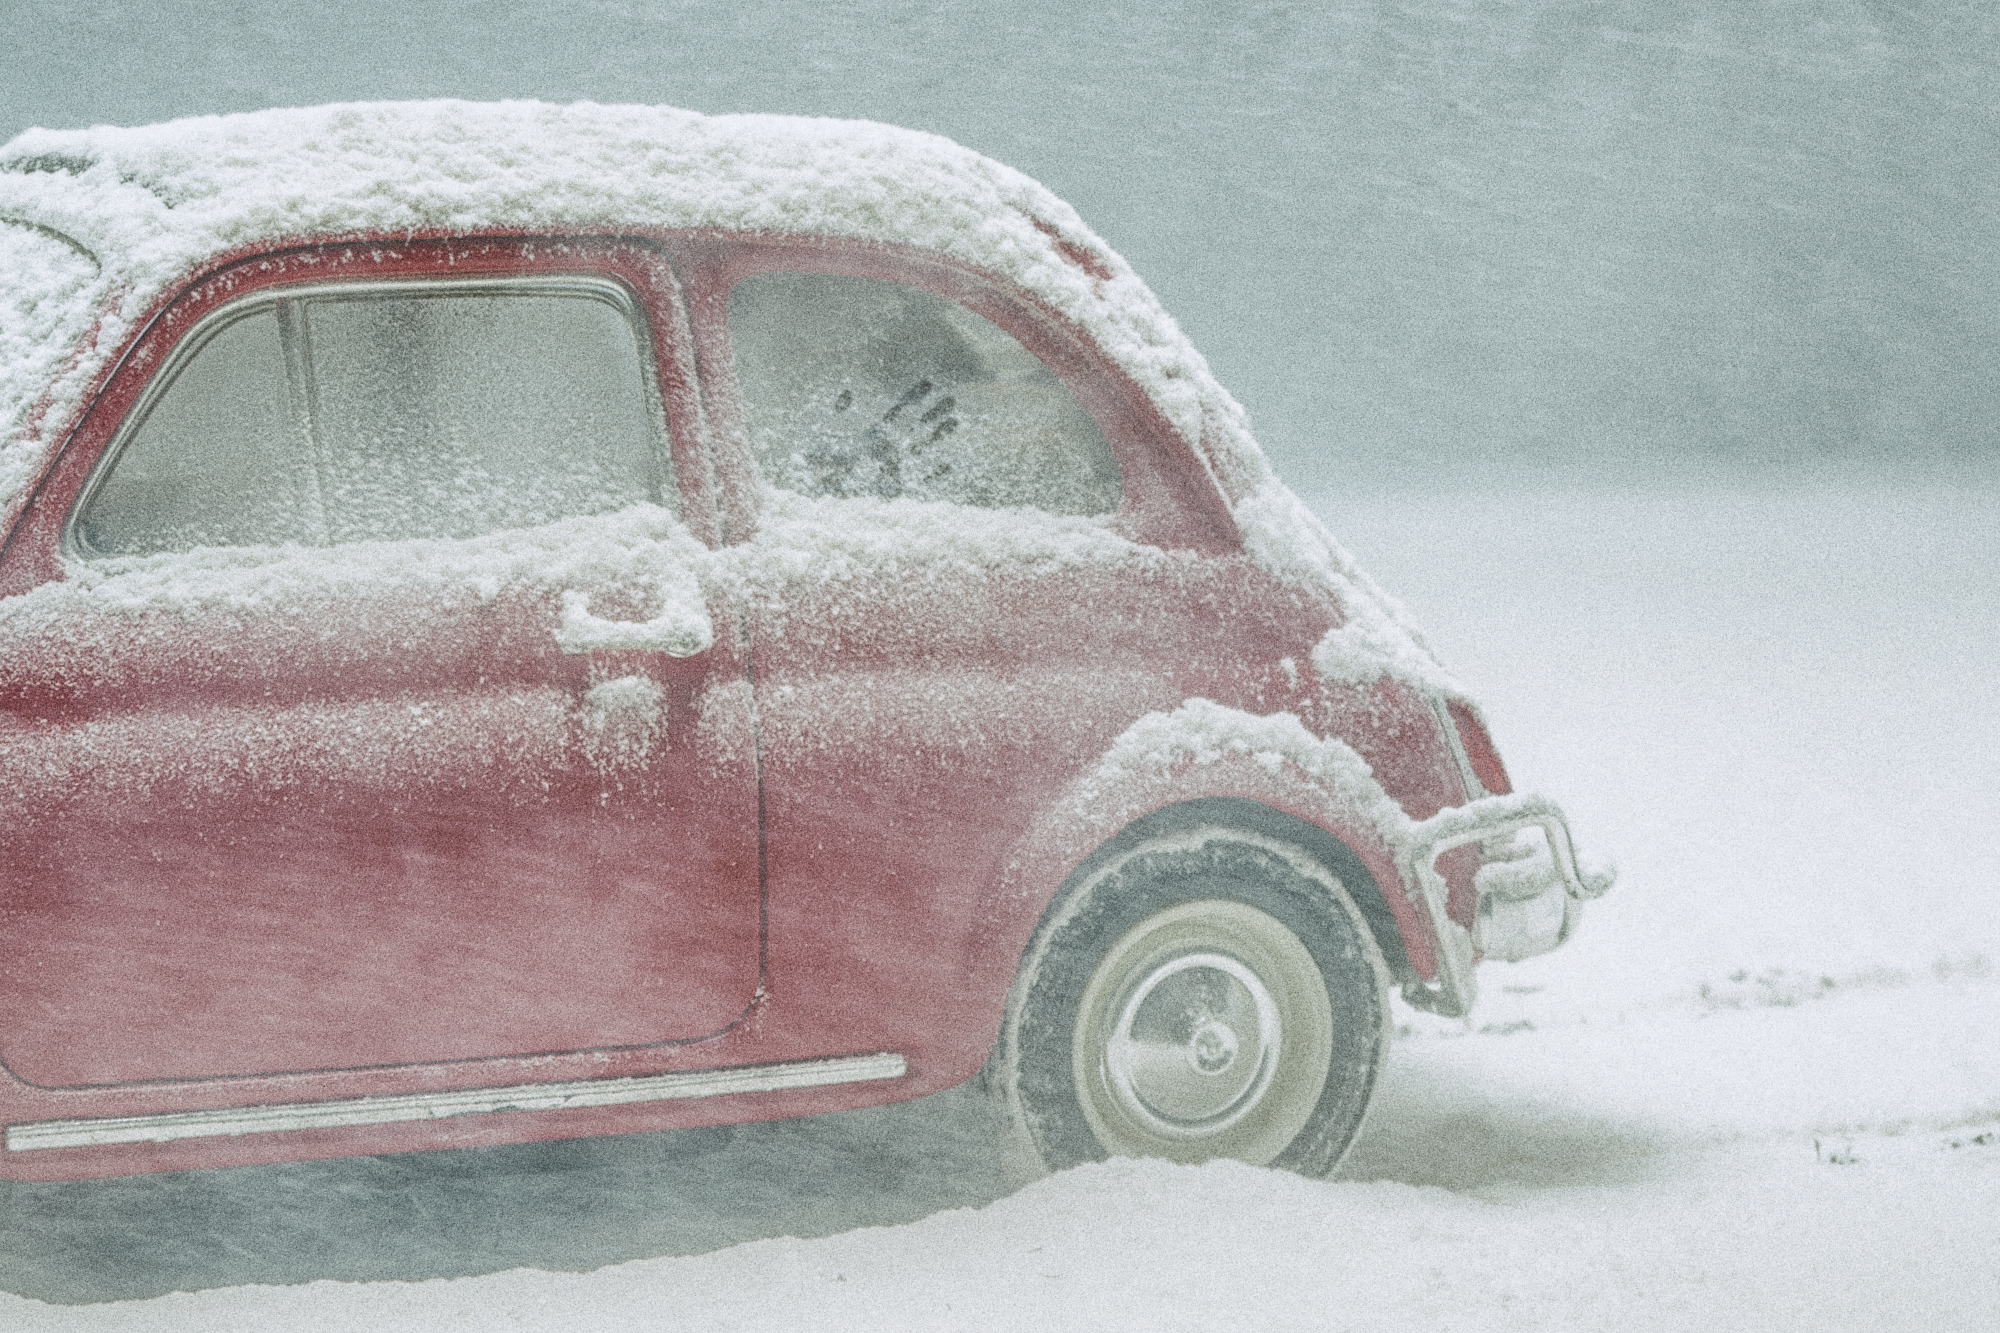
I love photo manipulations and digital art, but what is really cool is to do all you can in camera. It is not only fun, but it also gives the image a more realistic look.
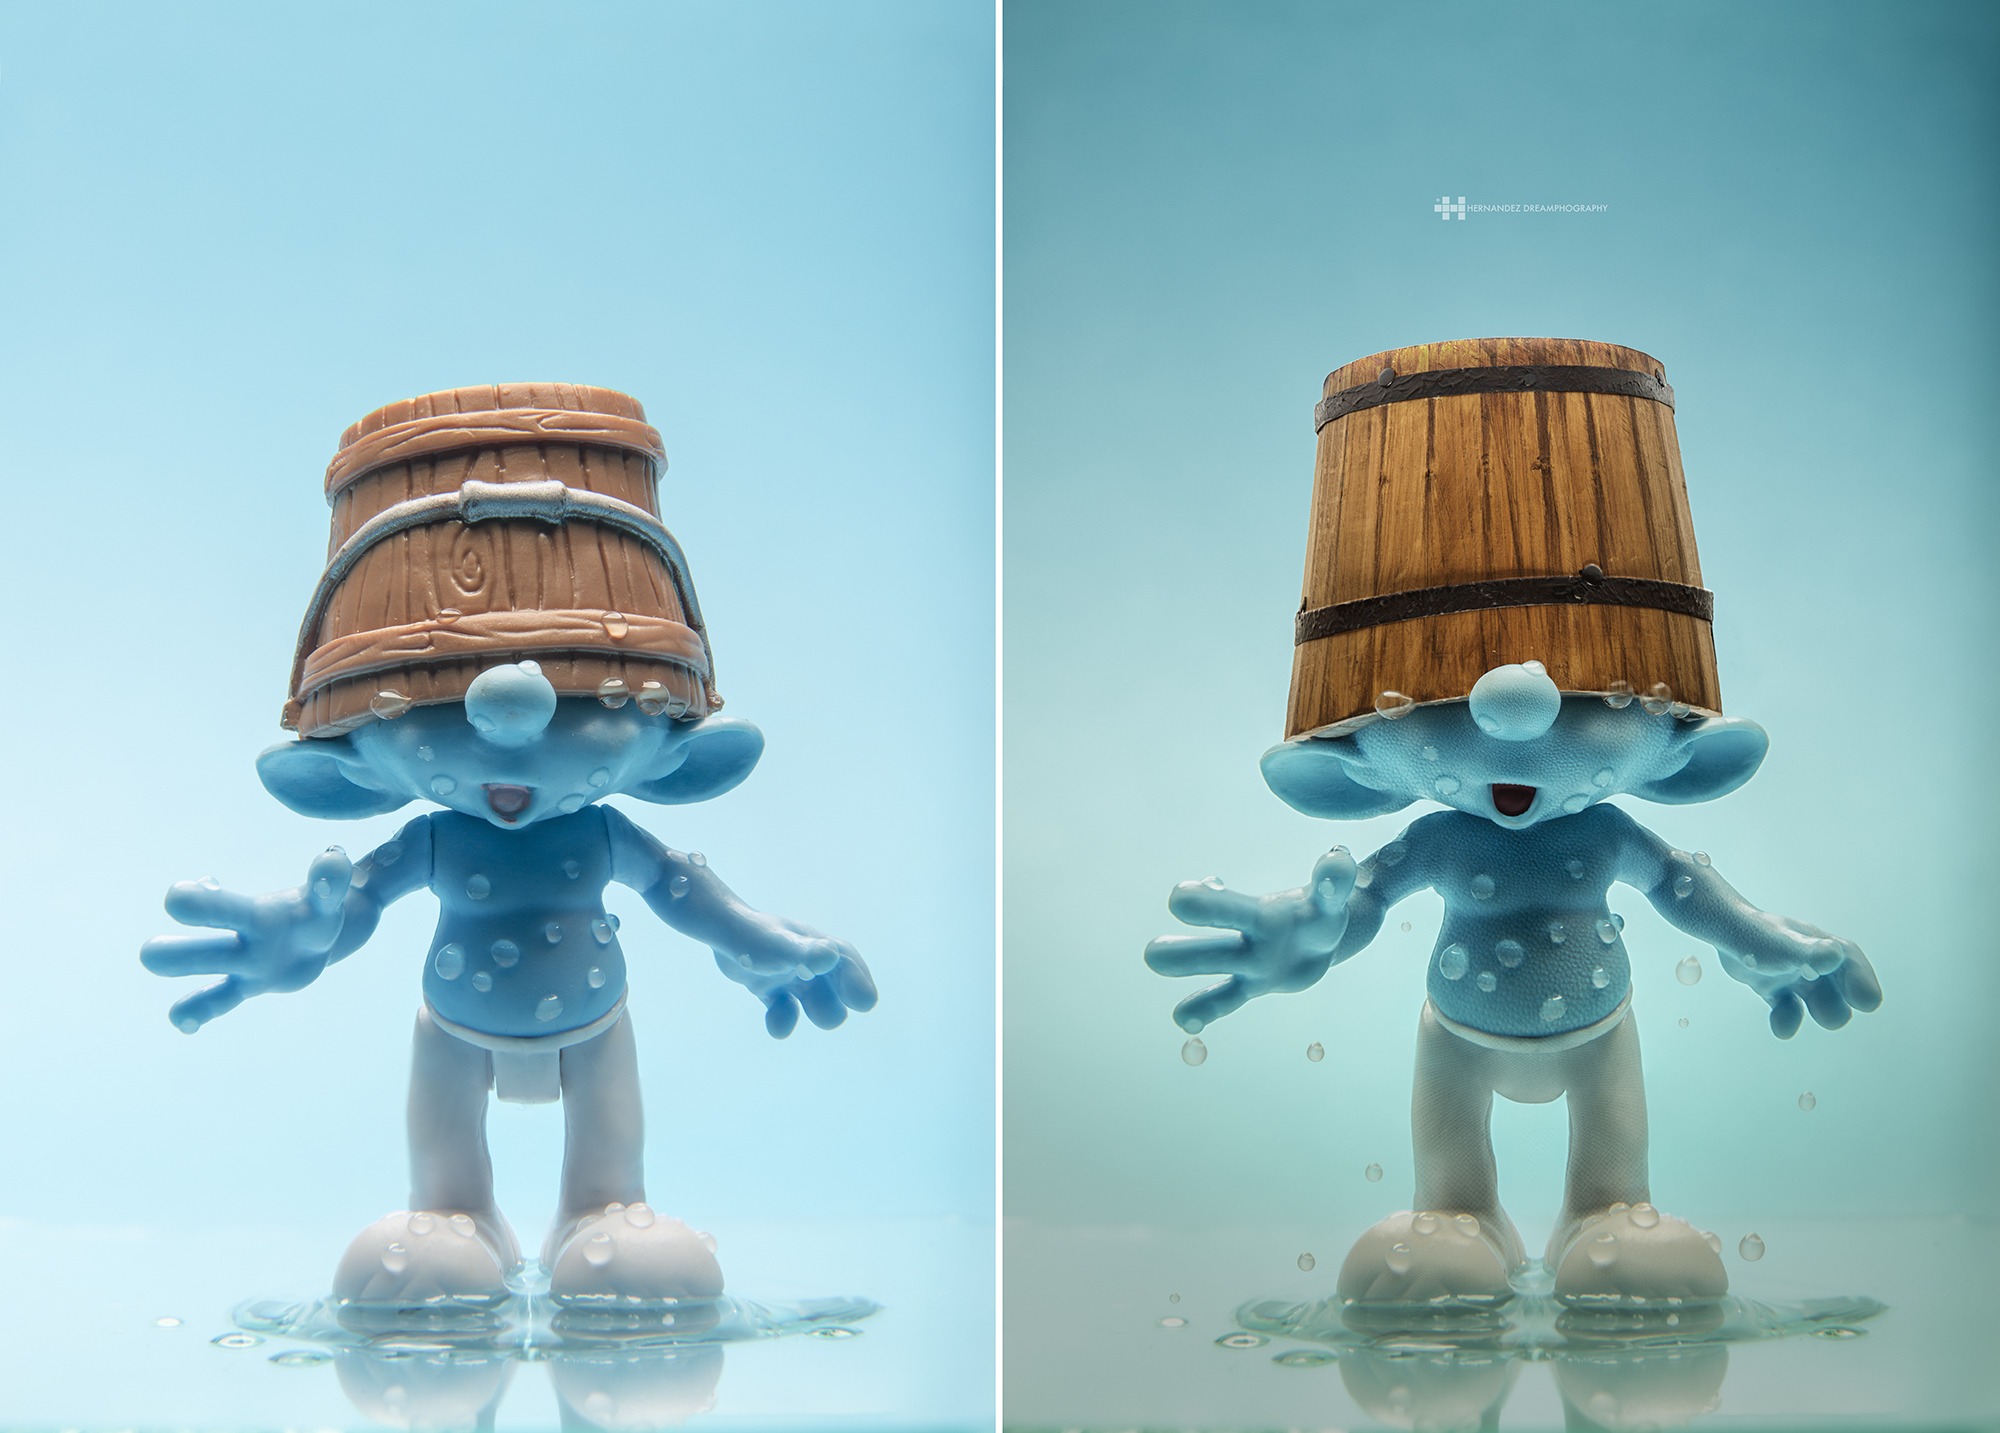
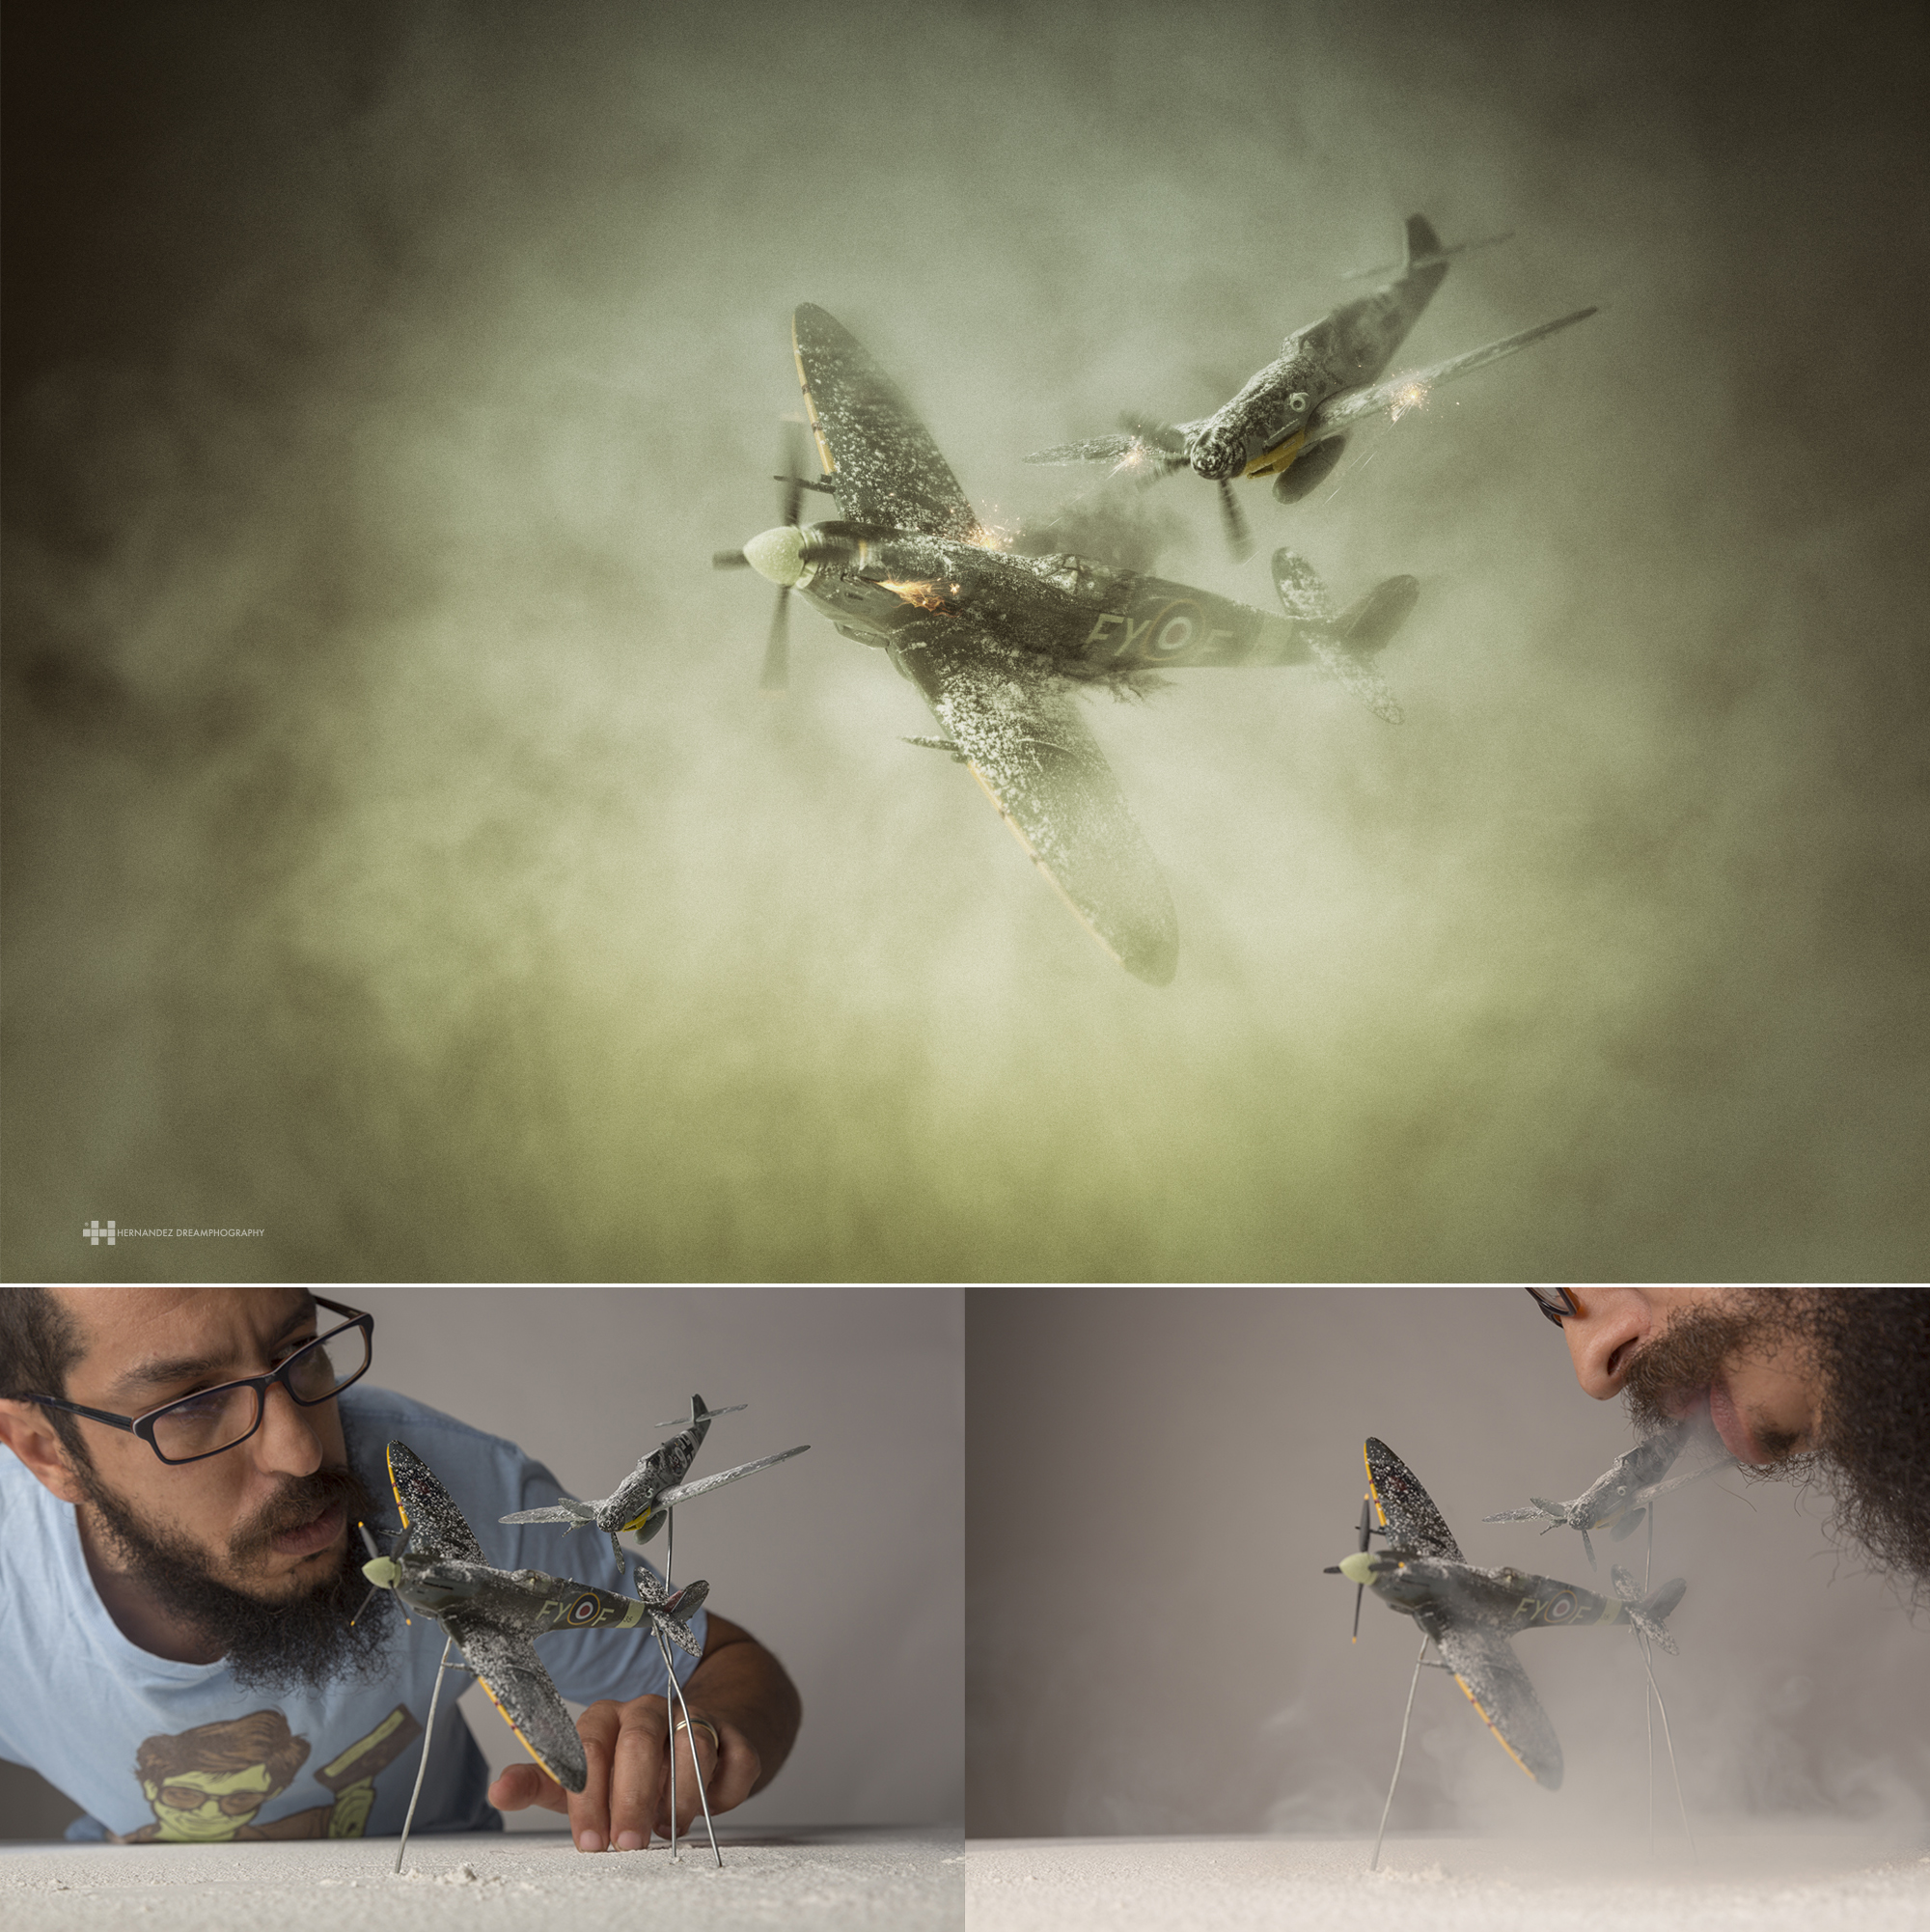
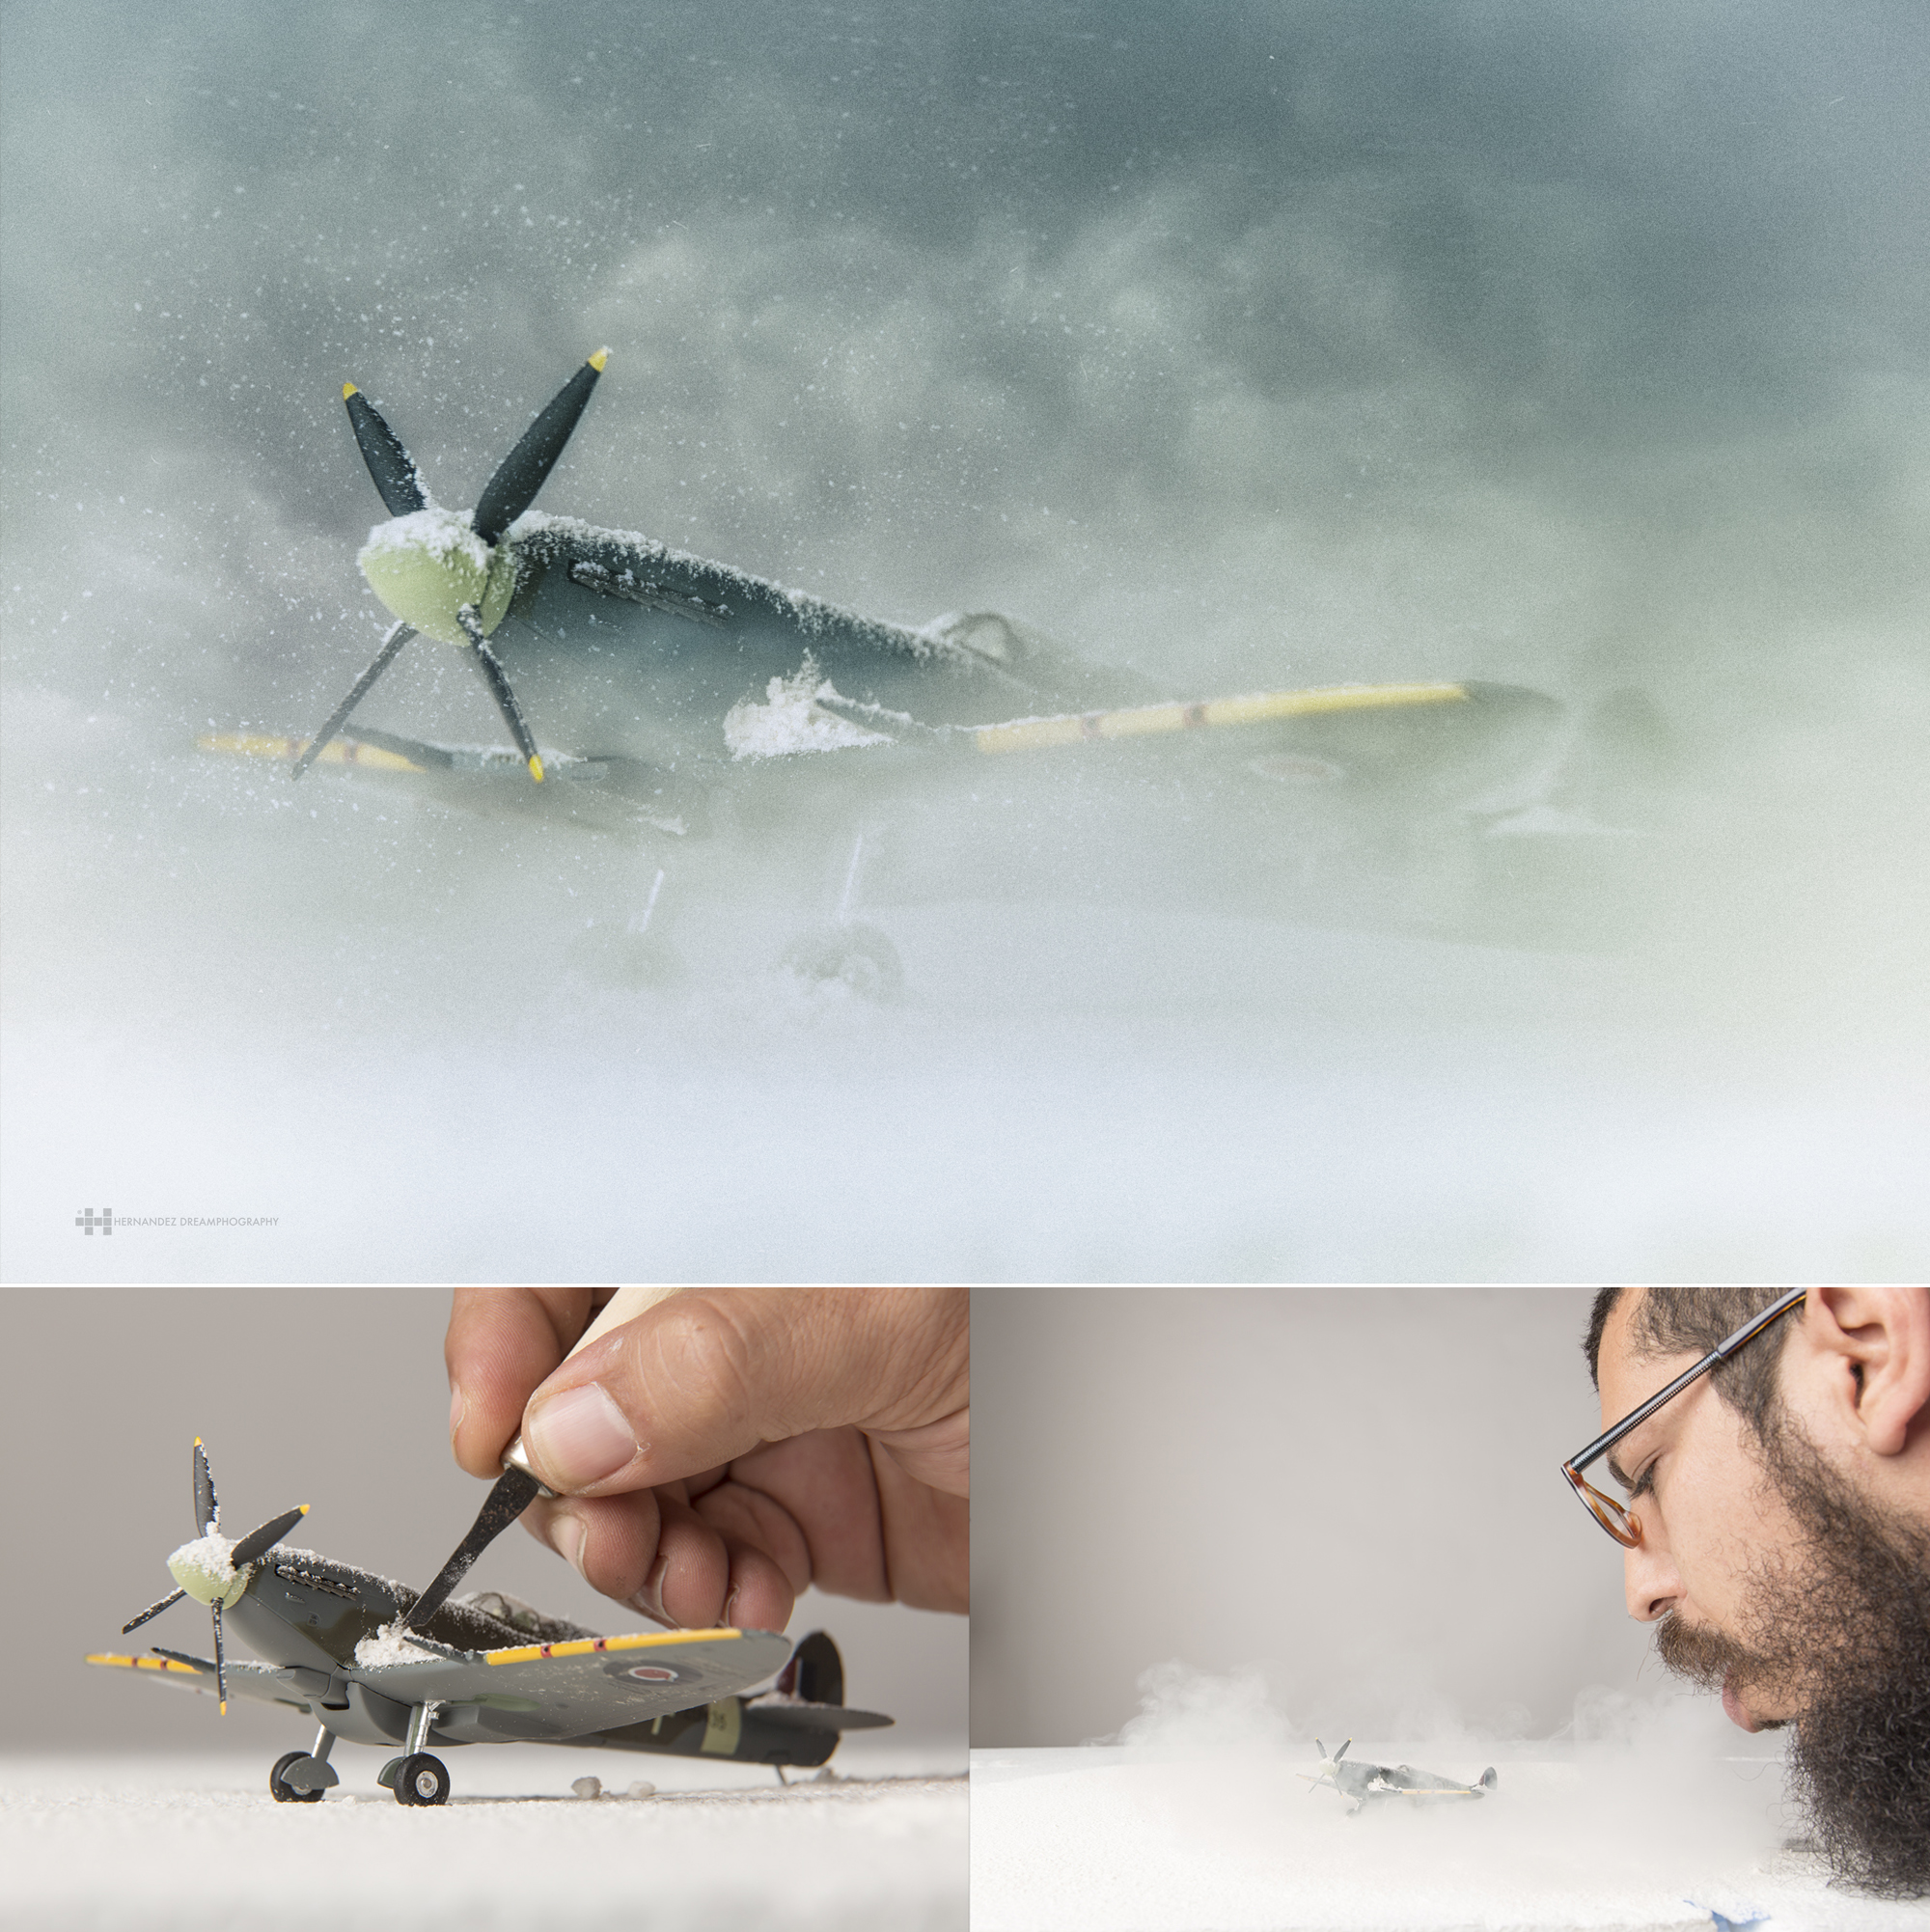
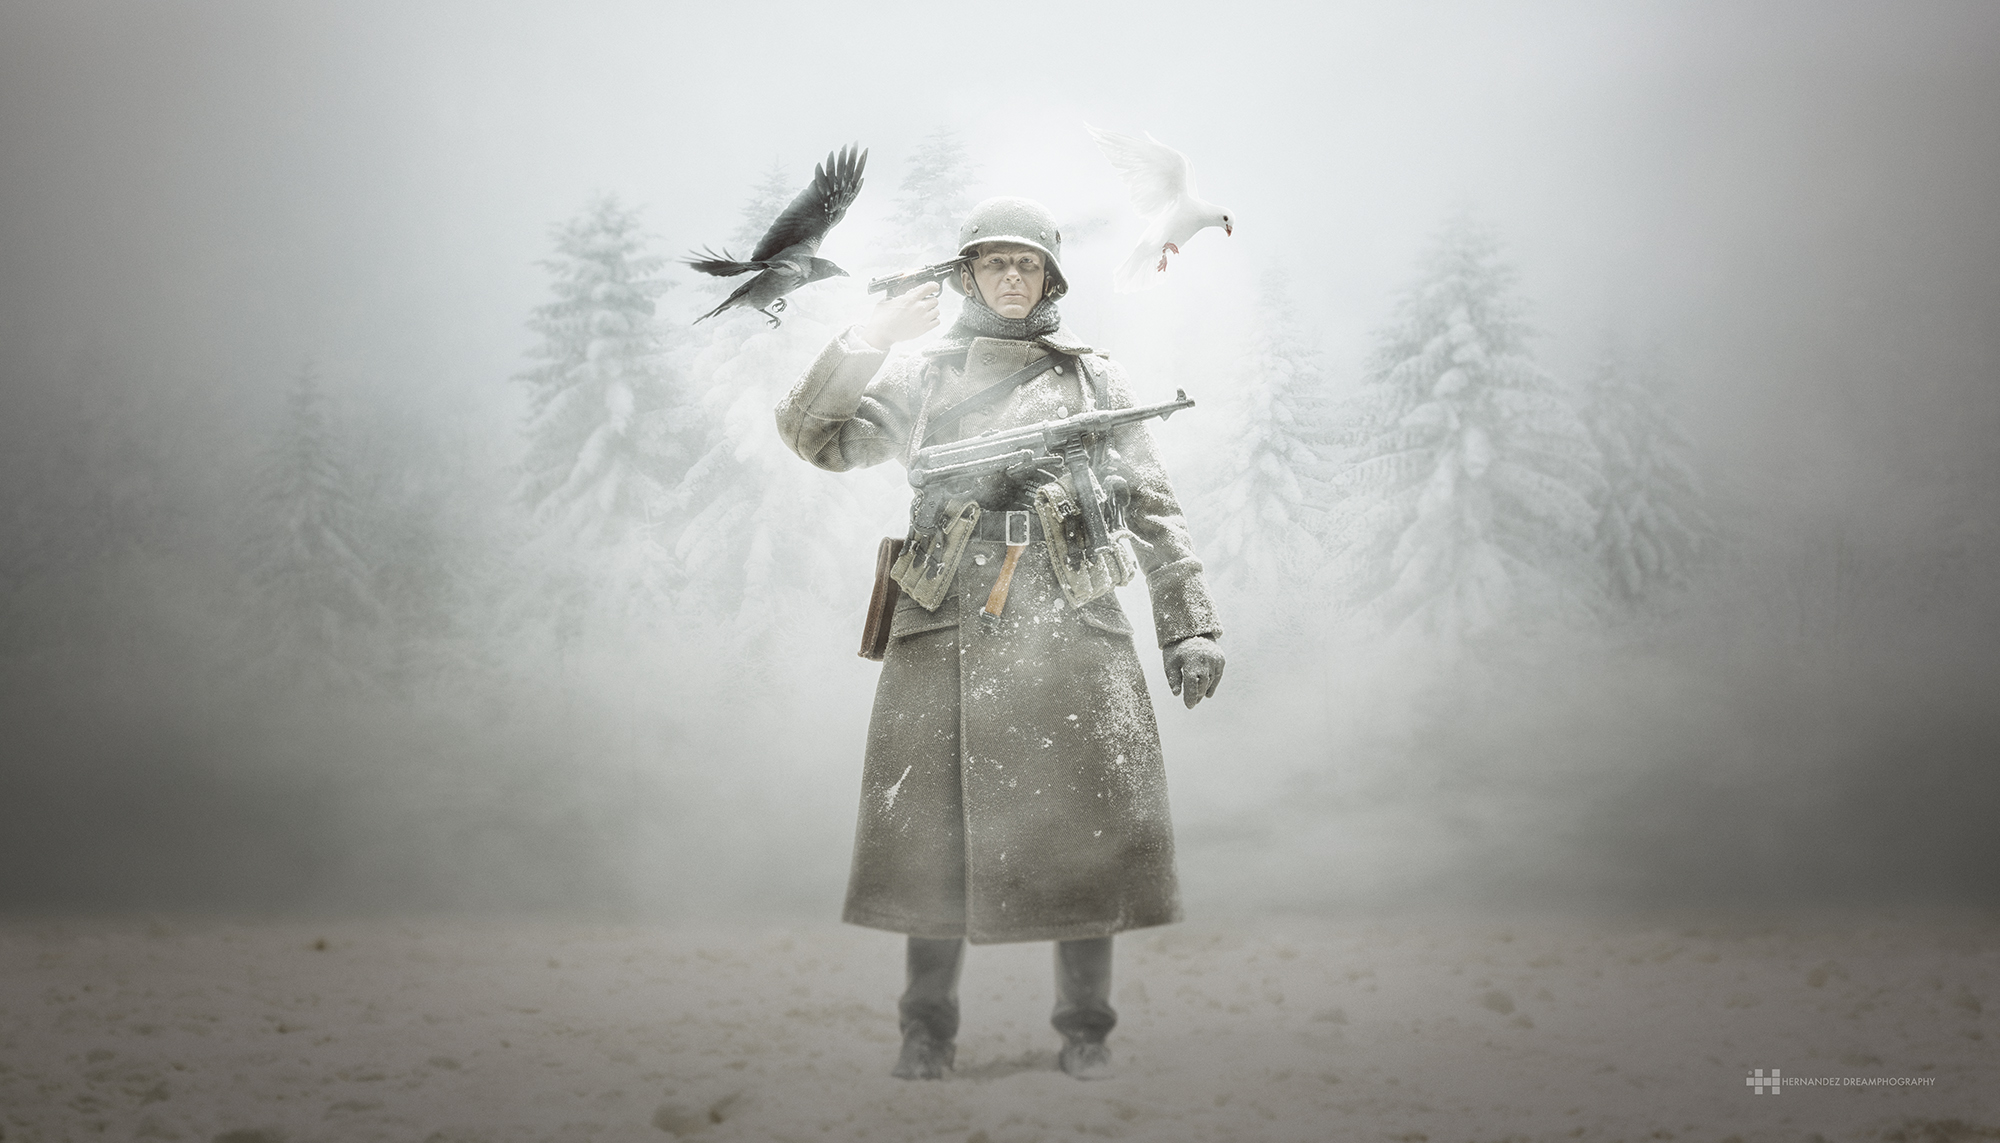
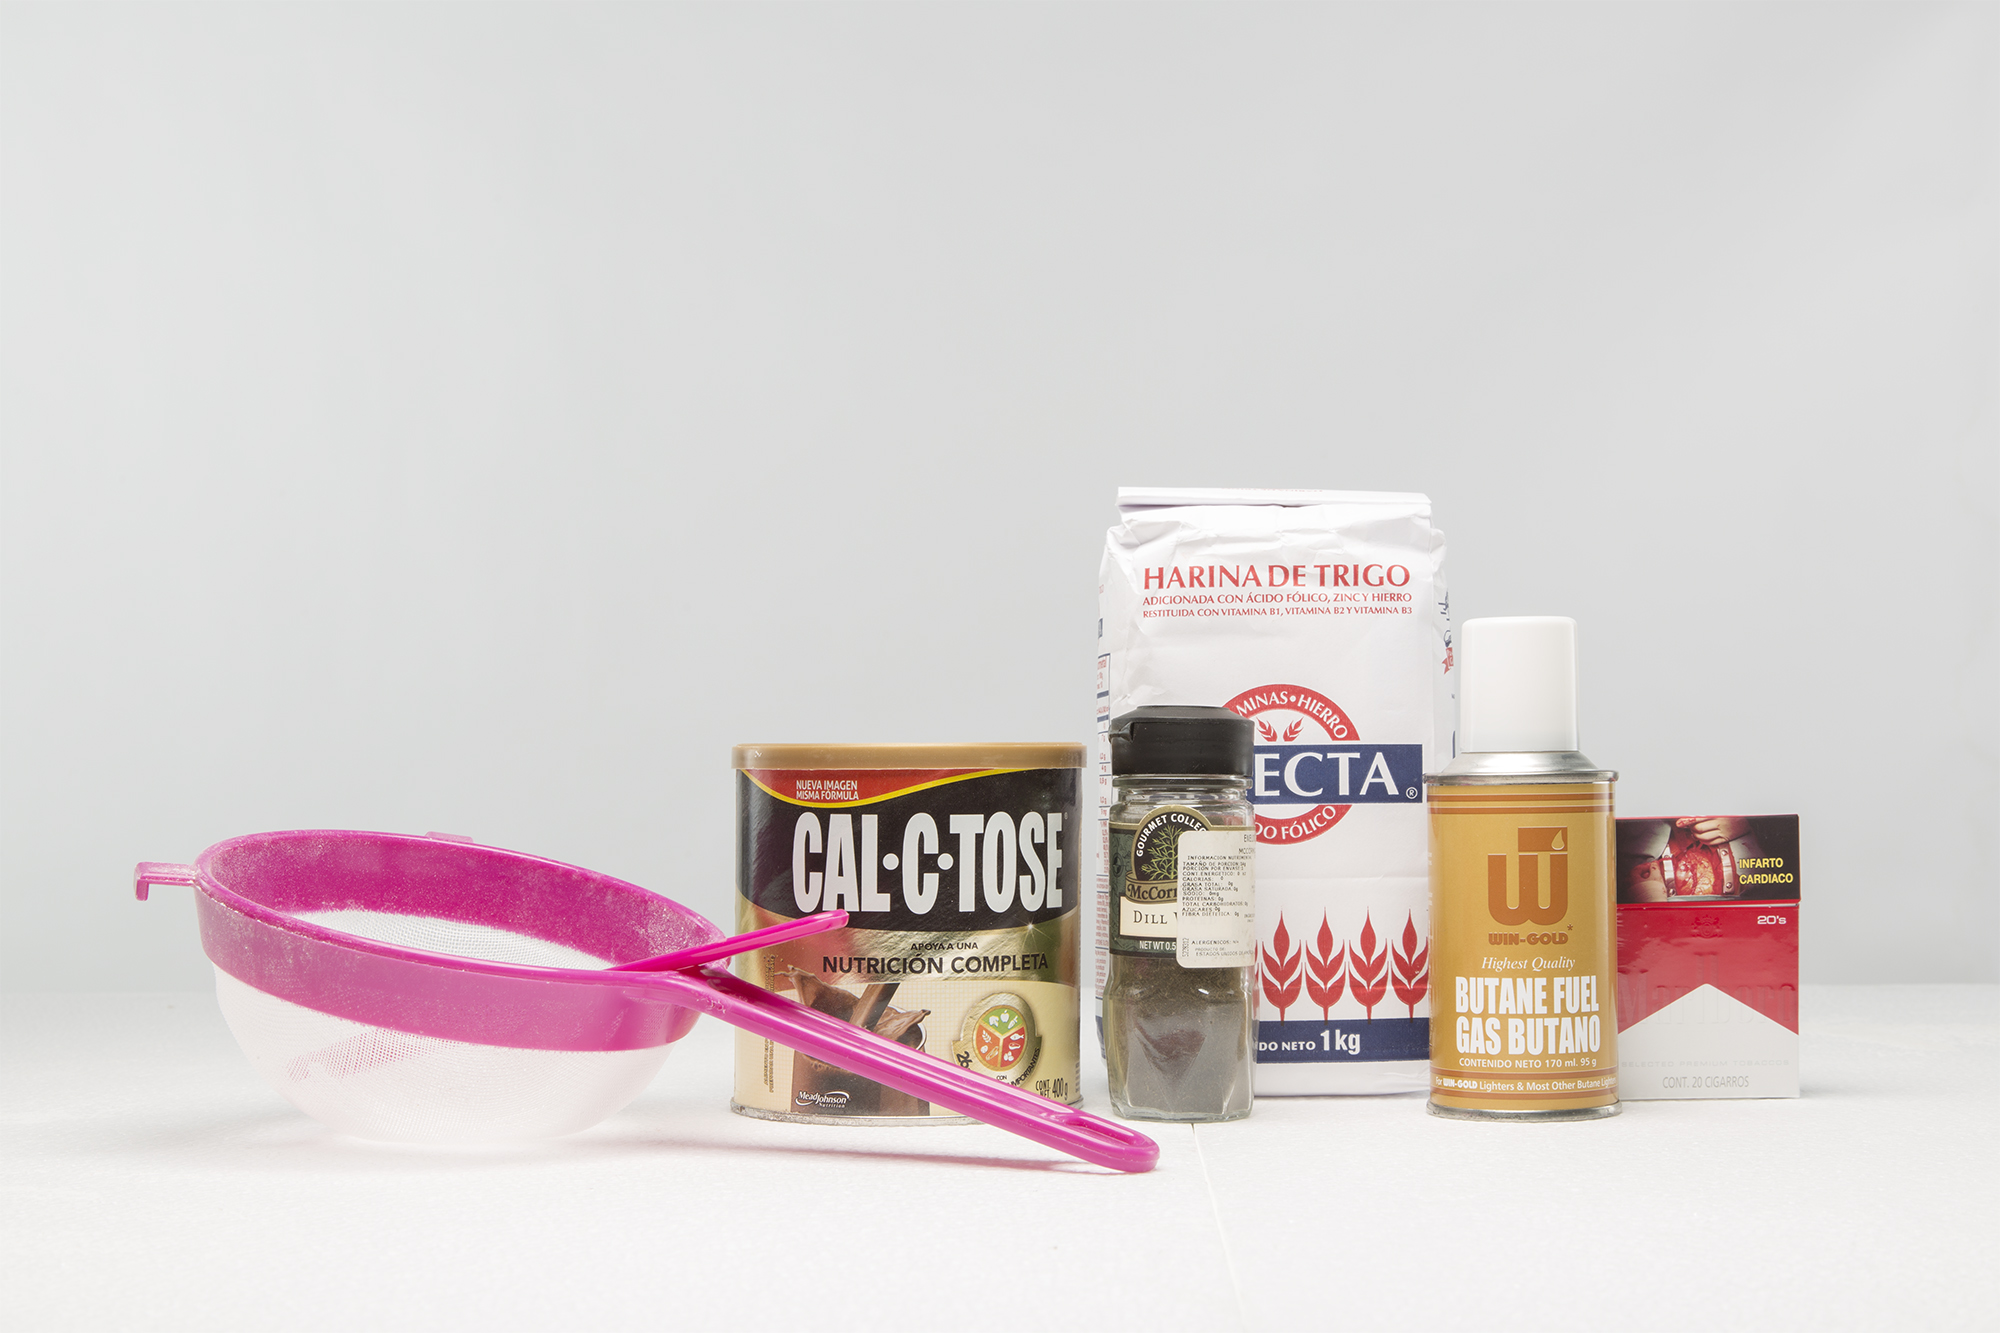
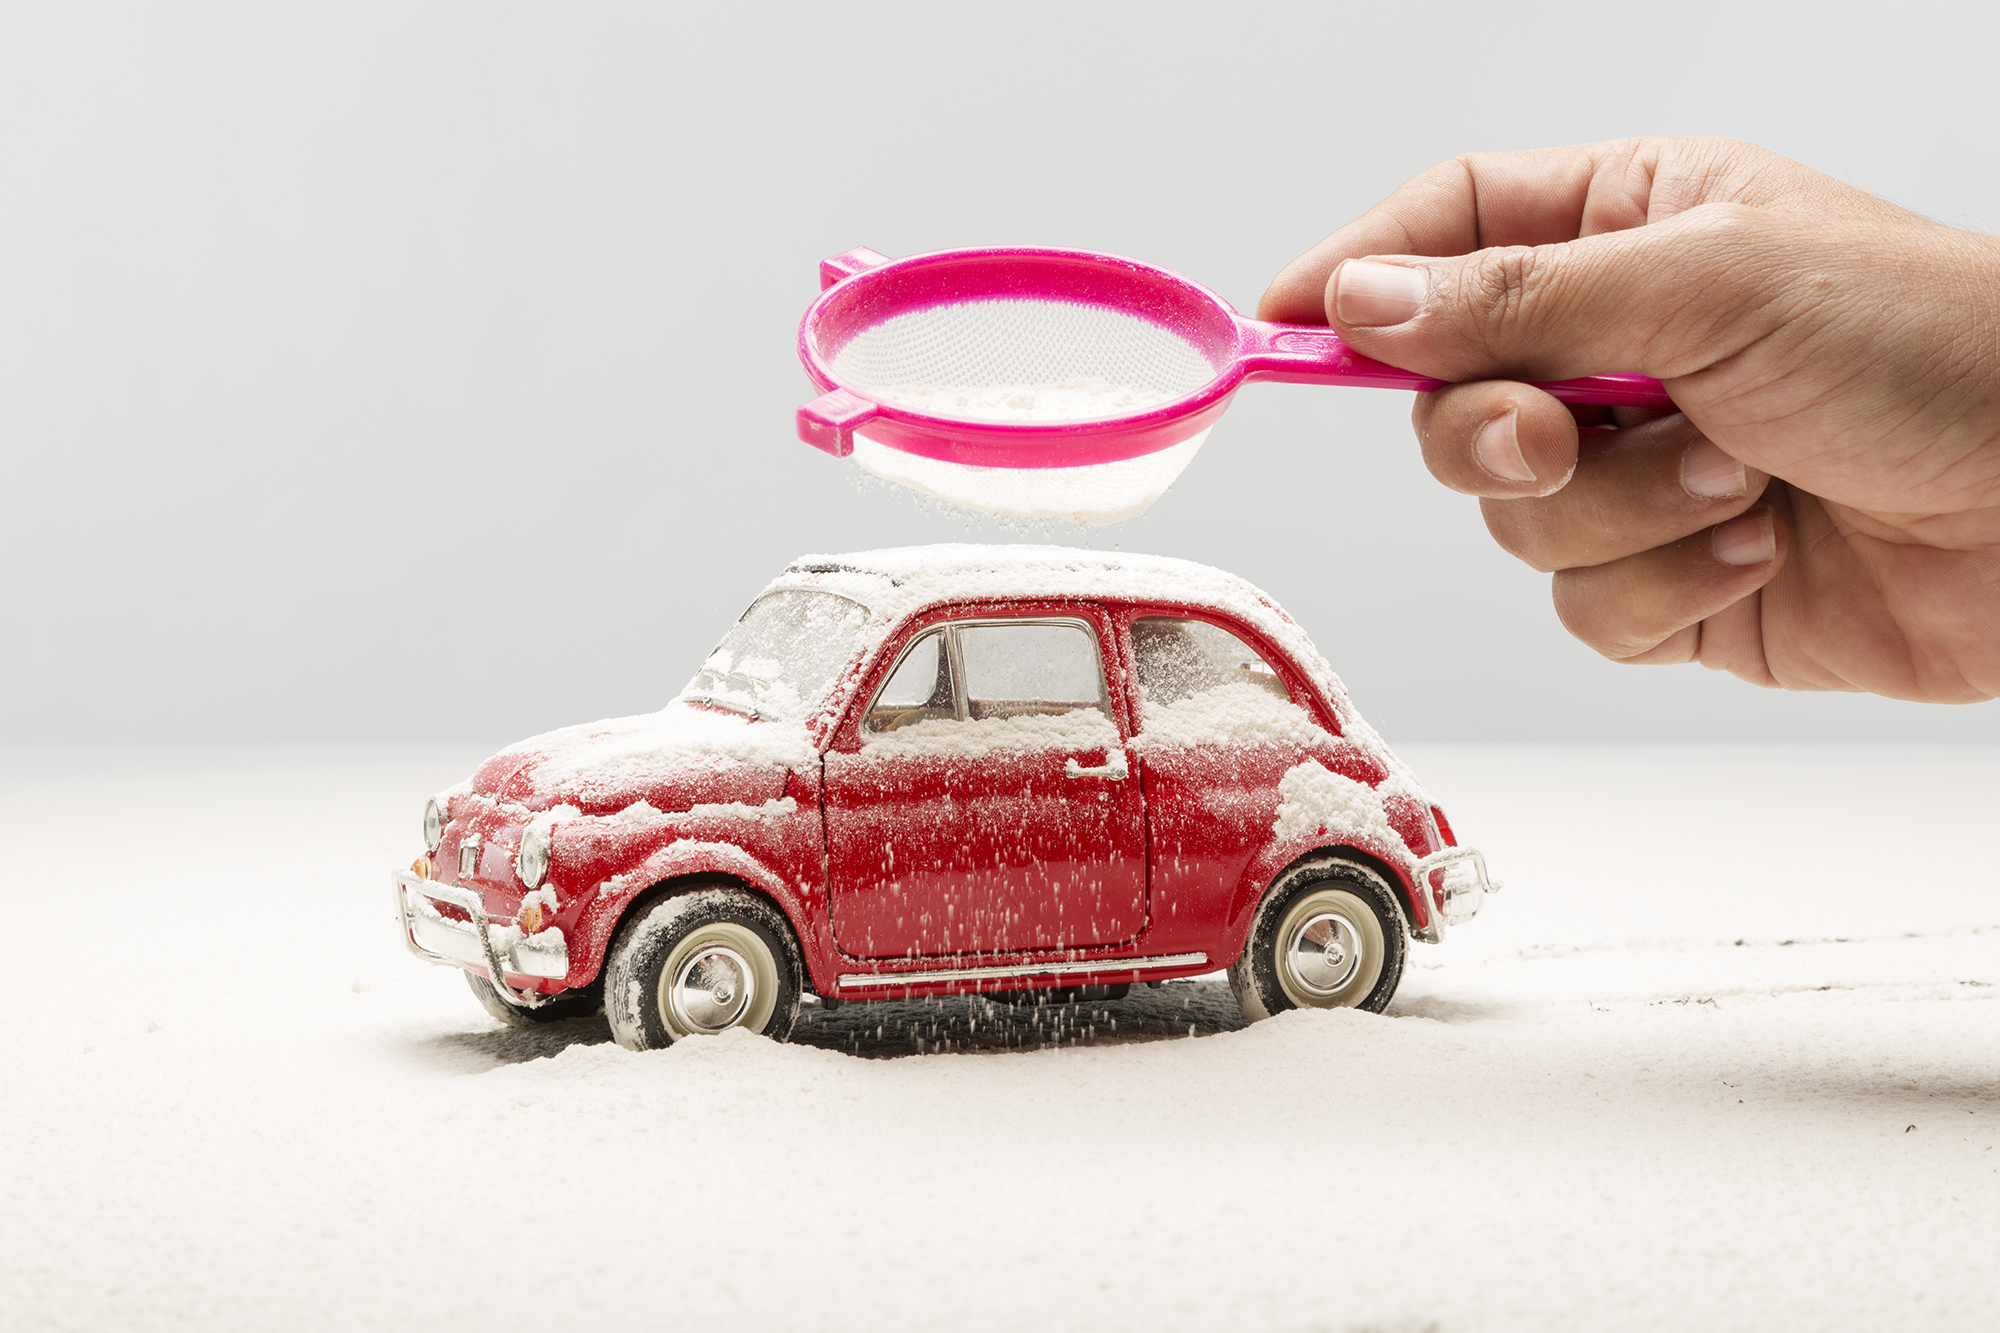
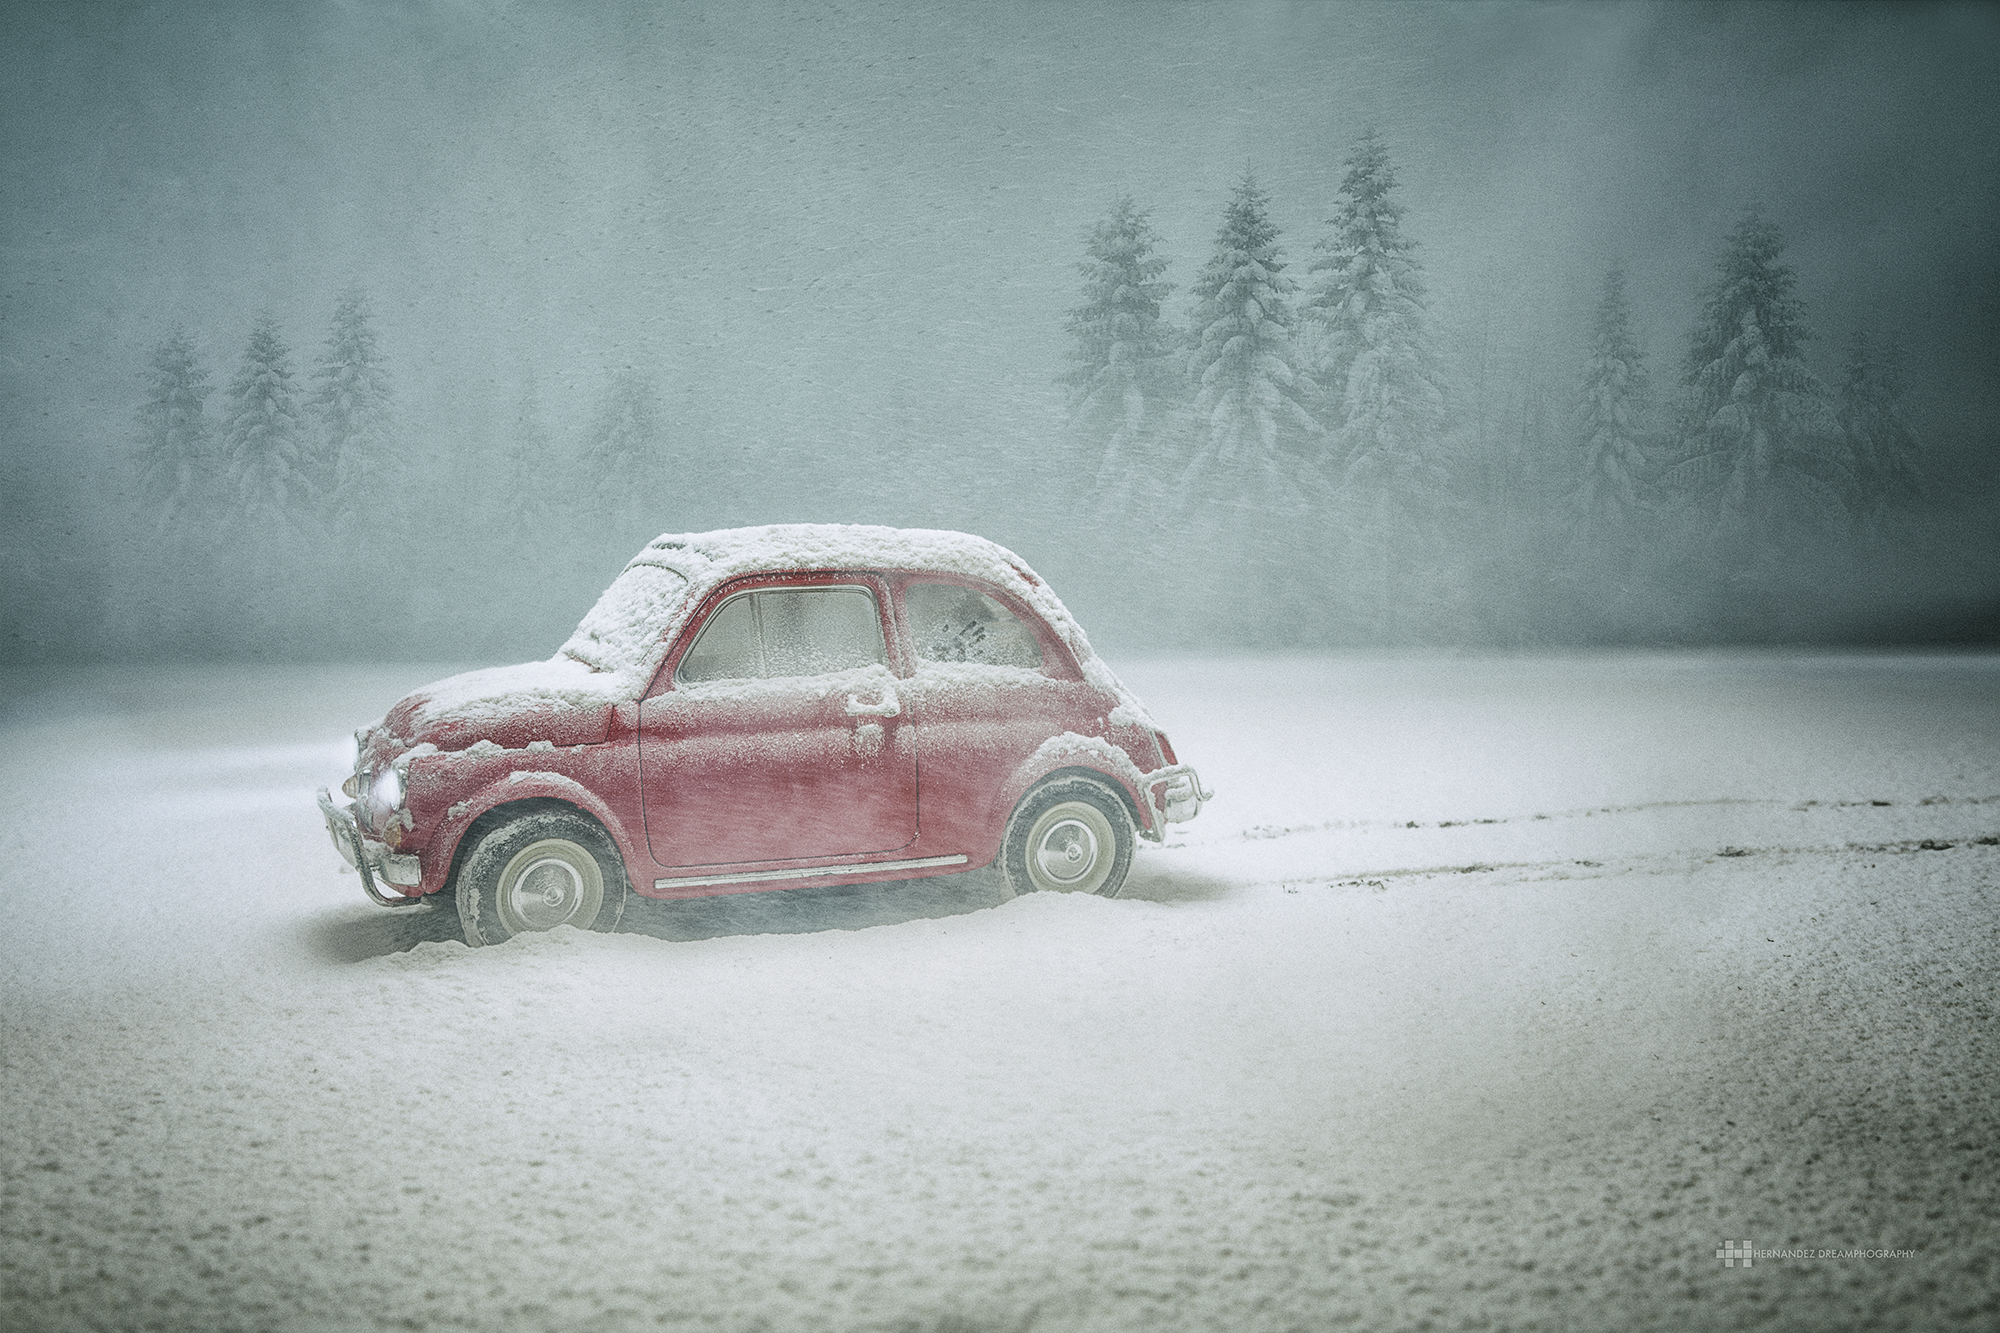
So if your model is in the snow, use your imagination and create a snow scene. I use wheat flour to “make” snow and I use corn flour to “make” deserts.
If I want to add some atmosphere I use smoke from a cigarette (you don’t have to smoke, but I have found this is the best way to control small amounts of smoke and put them where you want) or spray water for a rainy day.
If want to make droplets I use corn syrup or if I want to freeze something I use butane gas (beware, butane gas is extremely flammable so don’t use it while creating smoke with a cigarette).
The possibilities are endless and there is no one recipe, use your imagination and try different things. Most of the things you will need are at home or at the corner of your superstore.
Be creative.
Post-Production:
Post-production is what will give the final “punch” to your image.
In post you can insert images to your background, elements that complement your story-telling, effects that could be too complex to do in camera, adding sense of motion, etc. All of these are tasks for digital artists and most of them are done in Photoshop.
Also important in post is the color grading – it’s what will give the final mood to your image. It will integrate all your elements in a better way. Color grading can be done in Photoshop or using a third party filters like “Nik Software”.
Conclusion:
In the end, Toy Photography is just a mix of playing with technical photography aspects. The technical side can be learned and is “easy”, but the “hardest” part of toy photography lies in our minds and in our hearts, and that is staying childish, foolish, dreamy…
Learn how to play again. If you have forgotten how to, just spend some time with your kids. If you don’t have kids, then grab some memories from when you were one!
—————
Here are some behind the scenes images illustrating Felix’s process of creating one of his projects, “The Love Car”. You can also watch the BTS video at the top of the page:

You can see more of Felix’s work by following him on Facebook and 500px.
RELATED: The Love Car 2018 by Felix Hernandez


great….
Thanks Voltax!
really nice improving with passion and special technique for ur best fine art photography…. hopin’ we can practise from you Felix, anyway excellent job !!!
Super cool & inspiring!
Amazing attention to detail. I’m blown away by that.
This is wonderful. I’m really interested in toy Photography but just seemed very daunting. Thank you for this. Is there a book / website you could recommend to help with the lighting. I’ve been a natural light shooter till now.
Thanks
Hello, Felix! 3 years ago I never knew about photography I just explored this hobby just for fun but I was really inspired at your photo, the one with an old airplane and snow, that photo became one of my inspiration for one of my photos, instead of an airplane I used my SHMA Godzilla 2014 as my subject and I use my mid-range smartphone’s camera. Your photos give me insight about the world of photography
I just wanna say thank you this post is very helpful. Your works are the source of my inspiration and motivation.