As megapixel counts go up, so do file sizes, making data management a critical aspect of every digital artist’s workflow. With RAW file sizes typically ranging between 30MB-50MB an image, that can add up drastically and require a host of pricy external hard drives or cloud-based services.
There are many methods for decreasing your storage footprint, but not everyone has the time to commit to culling and removing thousands upon thousands of photographs.
My current library sits at over 175,000 images, which would require two days just to view them all for one-second, let alone decide which ones are worthy of keeping and which ones deserve to be tossed in the trash.
RELATED: Best Settings for Exporting Images to Social Media
Fortunately, for Lightroom users, there is a wonderfully simple method for reducing RAW file sizes by up to 67%. It involves converting your RAW files to DNGs, using Lossy DNG Compression.
Lossy DNG Compression reduces file sizes by up to two-thirds while maintaining the ability to adjust White Balance and finer details. This method of compression is a step up from converting to JPEGs, offering a happy medium for those that may wish to revisit older work.
And even if you don’t feel comfortable compressing all of your Raw files, you can use this method for the images in each shoot that are rated lower, but you still want to keep them.

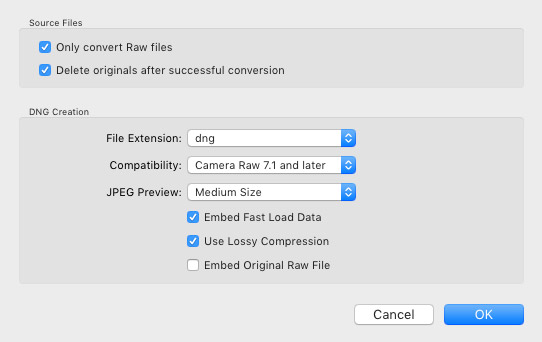
Recommended settings for Lossy DNG Compression
To Compress Your RAWs, Follow These Steps:
- Select the photographs that you wish to have converted. Make sure to select them in the Library, not in the Develop Module.
- From the menu, select Library -> Convert Photos to DNG.
- Check the following boxes: Only Convert RAW Files, Delete Originals After Successful Conversion, Embed Fast Load Data, and Use Lossy Compression. Uncheck Embed Original RAW File.
- Click OK.
After the conversation has succeeded, be sure to empty your Trash / Recycle Bin. Enjoy the extra space you’ve now freed up!
Watch the following video tutorial by Tony Northrup to learn about this process in more detail, and let us know in the comments how much space you’ve freed up!
Source: Tony & Chelsea Northrup | Featured Image – Photo: Verena Mandragora | Makeup: Katharina Zillmann | Retouching: Mareike Keicher | Model: Katarina Gradalska @ Visage | Photo Assistant: Stefanie Chareonbood


This is a really great tip, but for me, the only downside is if you want to use this DNG on CP1 it will not recognize the profile.