While I am still extremely attached to my own Beauty Retouching workflow in LR and PS, I like seeing how much Capture One has evolved over the years and now offers more great tools for Beauty Retouching.
Beauty and portrait photographer Jonas Nordqvist has visited Capture One blog to demonstrate his interesting process where he preps his Raw files and later color grades his beauty images in Capture One after retouching them in Photoshop.
Original Article: Achieving Perfect Skin Tones Using Capture One
Jonas Nordqvist: In this blog post, I will break down my workflow for you, so you get a better understanding how my process works and get a feel for how powerful Capture One Pro 11 really is.
With that said, every photo is different, and I adapt my work process depending on the image. But, every photo starts in Capture One, either shooting tethered or importing from a memory card into a unique session folder for that specific shoot.
Capture One > Photoshop > Capture One > Exported product
Import and working in sessions
I always shoot my work tethered when its physically possible and the cable doesn’t hold me down. Capture One has a great engine for tethered capture, and it comes with a lot of perks like showing the rest of the team what you create without having anyone hanging on your shoulder. Another thing that I usually do is some minor adjustments as well as setting the white balance which will be passed on to every image captured. In the shot below I felt that the backdrop was too saturated, so I toned it down to get rid of distractions.
All my files go directly into a Session folder which I love working with. Every Session contains all the files from that shoot; RAW-files with settings, retouched PSD-files, exported jpg and so on, making it easy and handy to work with. I can simply move the whole folder to another hard drive when I want. More simple than working with big catalogues.
 The RAW process
Basically, the RAW process for me is to correct tonal flaws and imperfections that the image has, both in color and luminosity. Usually, I don’t do any big changes or the final color grading here. Instead, that’s the final step after I am done with all my retouch processes.
Analyzing the image
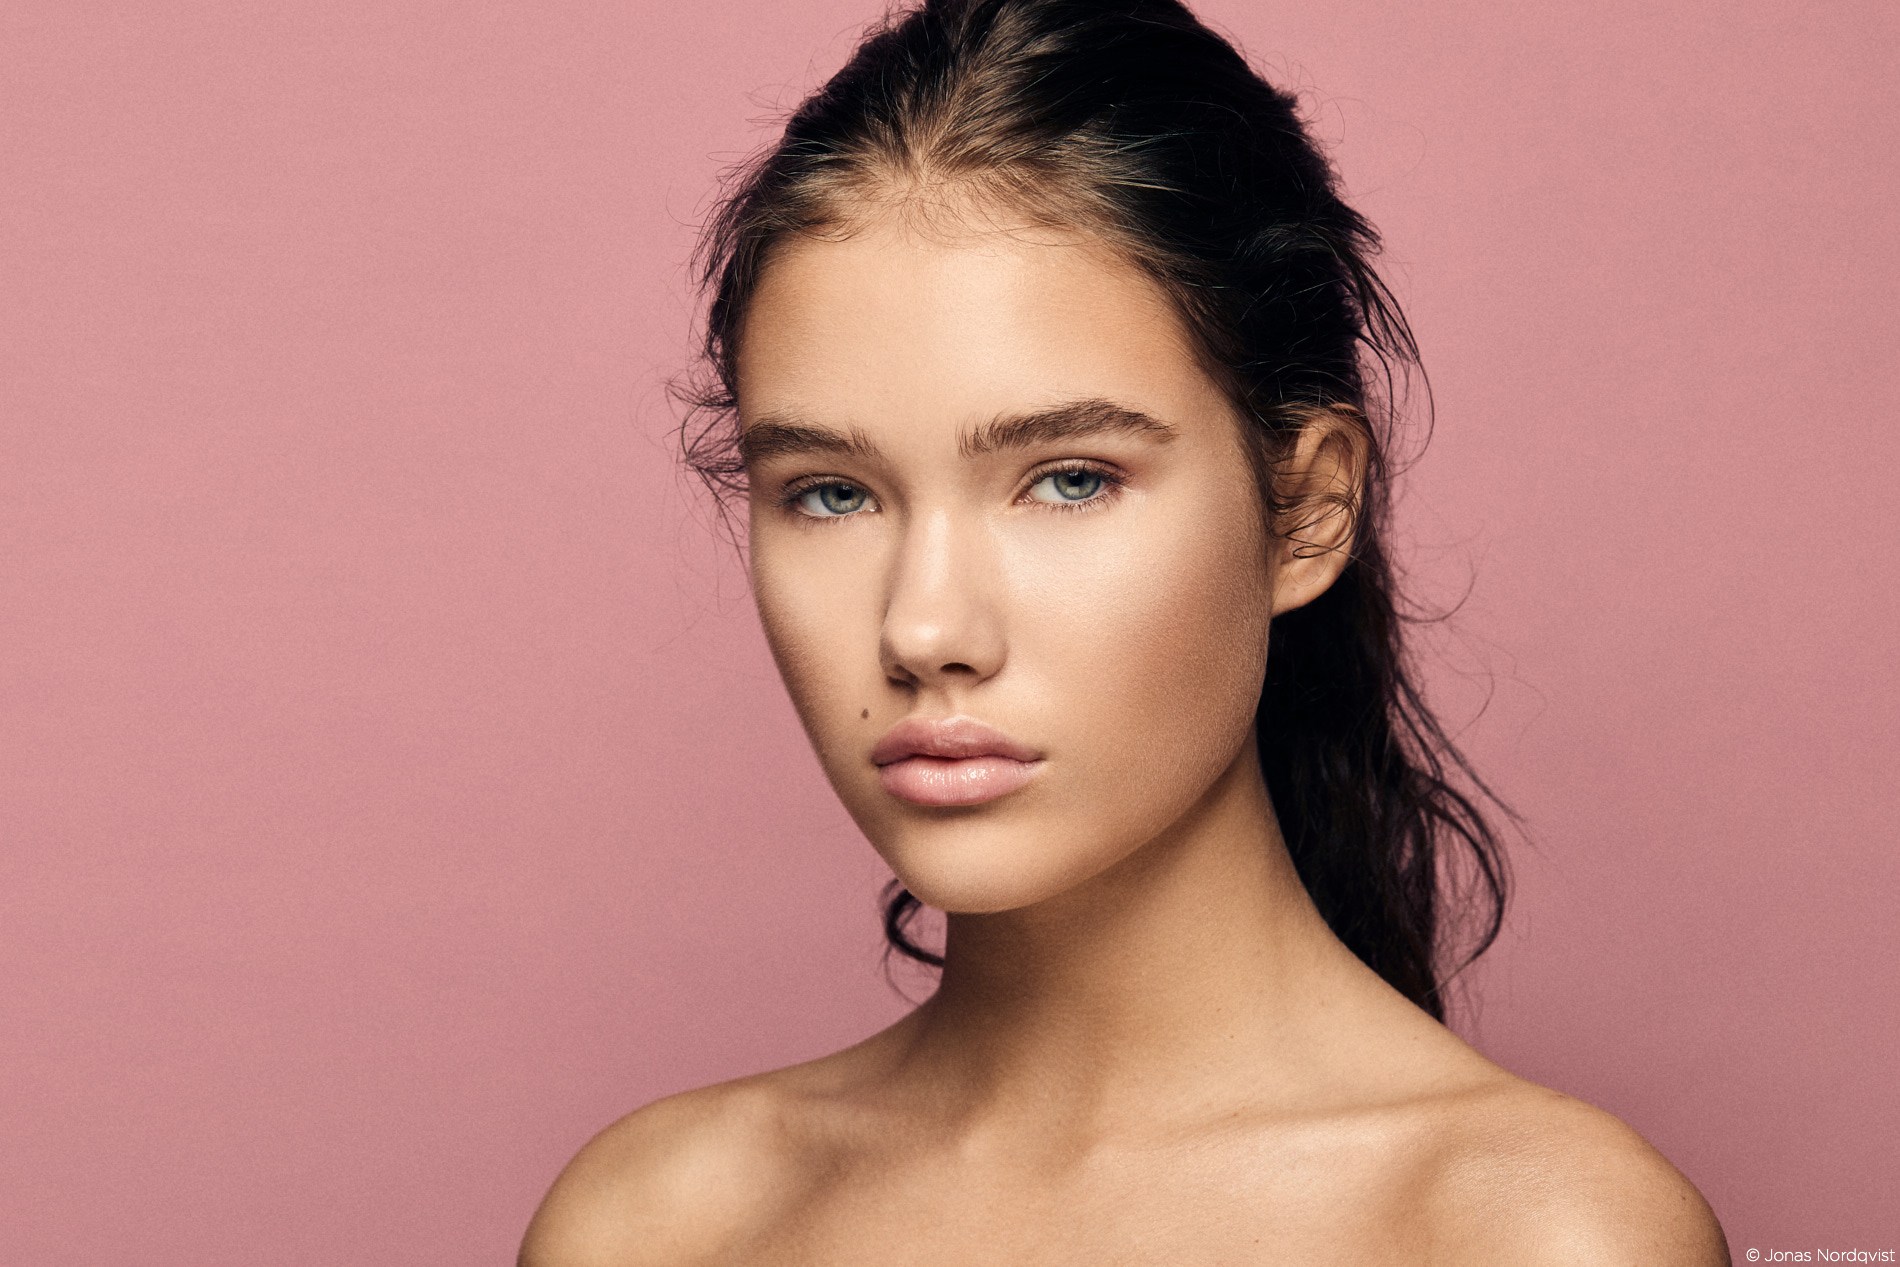
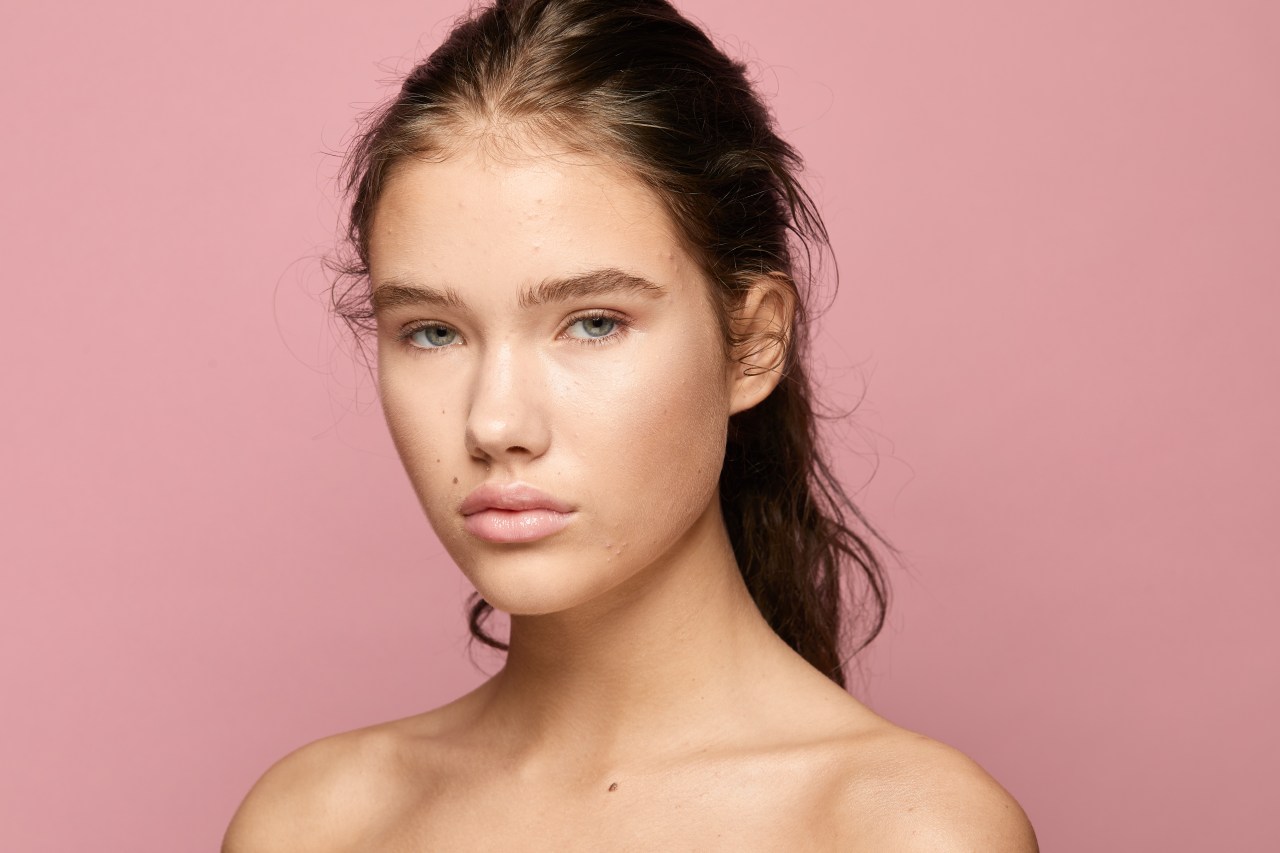
Let’s talk about this image. This was a beauty test shoot with Edda, a model from Nordic Model Agency in my home city. The shot was taken in studio with a beauty dish slightly above the model. I also used a soft box under the model to bring some shadows back.
Before I start editing, it’s good to come up with a game plan for how the end result should look. This is totally up to your creativity and there is no right or wrong.
I see three things I like to correct. First is the exposure that I feel is on the brighter side of the spectrum. Next is the skin tone. If you look carefully, you see a shifting tone of saturation and hue on the neck and camera left forehead. The last thing that strikes me is the background, which is too saturated and a bit dark for the look I was going for.

White balance
The first step of the RAW process is normally adjusting the white balance of the shot, even if I feel that it’s spot on, I go ahead and experiment until it feels right. The correct way is to use a gray card to meter the right value. But this can also make a warm summer evening look like mid overcast day, which you generally don’t want. For this image, I just made it a little warmer which I usually tend to do.
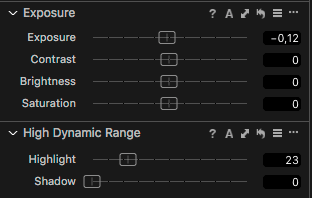
Exposure
Exposure is normally set right where I want it, but I tend to make some minor adjustments if needed. A good tip is to go with the mood you want, not the “correct” way.
If you watched a movie, it would look weird if every scene had the same exposure day and night, right?
For this beauty shot, I feel like it’s a bit too overexposed so I´ll dial down the exposure.
I still feel that it’s too bright in some areas so I’ll use the High Dynamic Range and bring back some details in the highlights. This tool is amazing still making it look natural. If you want to use these settings more selectively, you can use a layer to brush the settings to where you need it.
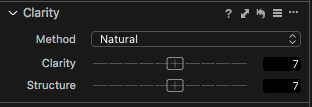
 Clarity
Do we really need clarity on a head shot? Too much can make your photo look cheap, but if you use it carefully, you don’t need to worry about it. The Capture One team has done a great job separating Clarity and Structure to make the changes you need. For this image, I bumped up the value slightly on both, making the image look sharper.
 Lens corrections
Capture One has great built-in profiles to correct flaws from your lens. Let’s say you shoot wide open (low aperture value), or with a wide-angle lens, this can be very useful.
This shot was taken at f/10 on a 100mm macro lens, so no corrections need to be done.
Changing the background color using layers and Color Editor
Like I mentioned before, I’m not pleased with the backdrop color, so my goal is to reduce the saturation and maybe make it a little bit brighter.
I went ahead and created a new filled layer called “pink backdrop,” and under the advanced tab in the Color Editor, I selected the color picker to select the background color. To easier see what color is in your selection go and check the box “view selected color range.” By doing this, some parts of the image will be shown in color and some parts in black and white. The colors that are visible in the picture are within your selected color range, and the unselected colors turn black and white. Here, I will fine tune the selection to have only the pink background selected. For a more precise selection, move the Color Editor window out from the rest of the tools and then expand it.
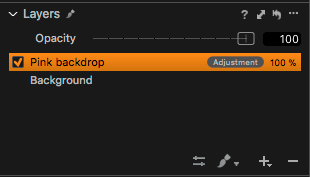
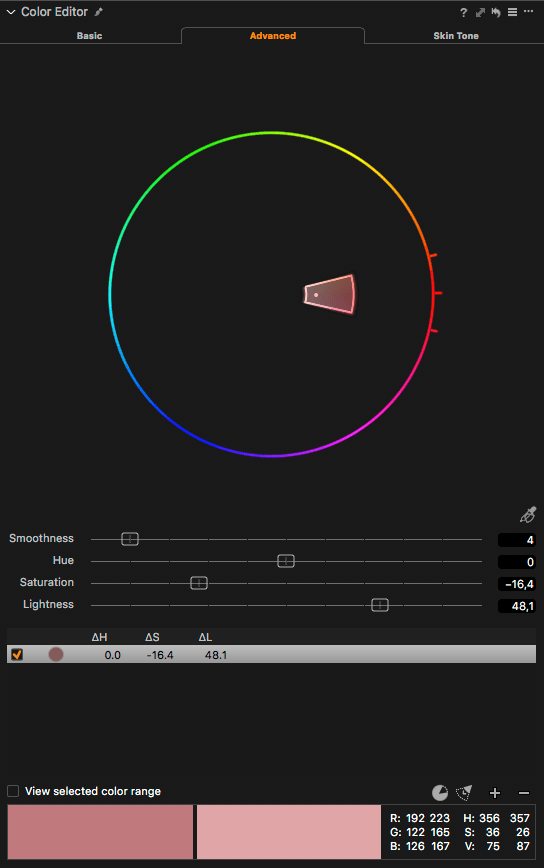
I still had some pink colors on the color range, so I used the “Erase mask” tool to mask it away. Now I adjusted the saturation and lightness to the look I want.
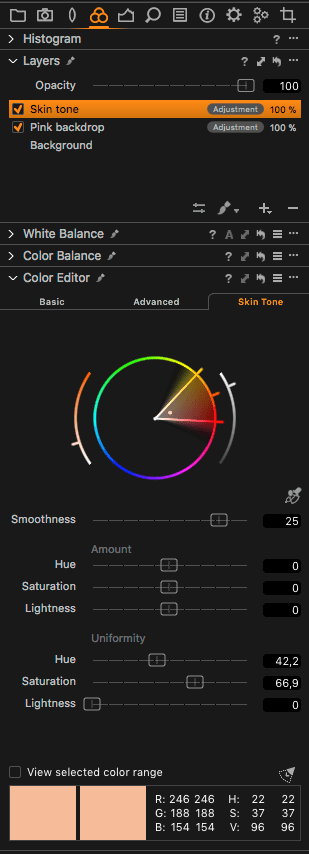
Skin tone
If we look at the skin, as I mentioned before, we can see some areas shifting in tones as well as saturation. The most outstanding shifts in this area are on the neck and camera left forehead which shifts to a more saturated orange tone. This is normal, and with a trained eye, it’s easy to spot on a lot of images. A great way to fix this is by using the Uniformity tools in the Color Editor tab. This process will save me tons of work in Photoshop.
I created a new local adjustment layer called “Skin tone” and drew a mask around the subject’s skin. There are different ways of doing a mask, but I’m most familiar with the shift-technique. While holding down shift, I click and draw the mask around the edges of the model and when I am all the way around, I use “Fill mask.” Here I also mask out the lips and other makeup areas that I don’t want to change.
The Skin tone tab has two groups of sliders; Amount and Uniformity. In the amount group, you selectively change the skin tones to a preferred look with hue, saturation, and lightness. The Uniformity tools are used to even out different variables which is very powerful.
Again, we use the color picker and try to select a natural tone somewhere on the skin. Then I drag the Hue slider under Uniformity up to 100 to easier see which tone I selected. If it’s too green, or too red, I’ll select a new spot or adjust the selection on the color wheel.
Resetting the Hue slider again, then I carefully try to find a value on Hue and Saturation that will correct the tone shifting but still looks natural and does a fairly subdued change.
Exporting the image to a PSD
When I feel that I am done with the RAW process, it’s time to export the image to Photoshop for further retouching. When right-clicking the image, you have the option to ‘Edit With,’ which will place the image next to the RAW file in Capture One. Here I use PSD format, 16 bit and Adobe RGB profile.
Make sure to select ‘Crop as Path (PSD),’ as you will have the full image available if needed. Any crop you might have made in Capture One will be included as a path for instant cropping in Photoshop.
Round-trip with PSD file
When all the retouch is done, I can go back to Capture One and there I’ll find my file in the output folder. The great thing about this is that I have access to all of Capture One tools and can apply them to any PSD file as I like. This fits perfectly with my workflow and makes it all very easy to do the final edits on multiple images for a story. This also allows you to make more room for drastic edits, high contrast and mixing with different colors as you like. Or you can try any of the Capture One styles. As in the RAW-process, I try to keep it natural and subdued.
In my process, this is usually where I do my final color grading, make a black and white copy and without having to retouch all over again. A great tip is to make different variants of the image, so you can compare what crop you like the best, or maybe if the image looks better in black and white.
The first step on this image will be to add a slightly darker/tanned look to the skin. There are multiple ways of doing this, but I will be doing it in the advanced color editor by selecting reds and yellows and then slightly bring down the lightness and saturation.
Another favorite tool that I tend to use often is the Color Balance. Making the shadows “cold” and the highlights “warm” will add a nice depth to the image, but don’t push it too much!
RELATED: How to Color Grade using the Color Balance Tool in Capture One Pro
Contrast is key, and you might have noticed that I haven’t added any yet. But when I do, which I always do, I do it with curves and very often the luminosity curve. For this image, I will do a small s-curve with luminosity, and then I darkened the image slightly with the RGB-curve.
 Almost done
Everyone is familiar with the dilemma of cropping an image, and I am no exception. With Capture One you can save different aspect ratios depending on what you are exporting the image for. Magazines can be 8,5×11 and then there is Instagram that uses 4×5 as the longest vertical.
Before the image is exported, I will add some grain to it. The grain will make the image look more analog, realistic and can cover up too much retouch. Make sure to select an export recipe and turn on the proofing, the symbol that looks like a pair of glasses. With this, you will see how the image will look in the resolution you export in. I made different recipes for a variety of purposes like Instagram, my website, client proofs and so on.
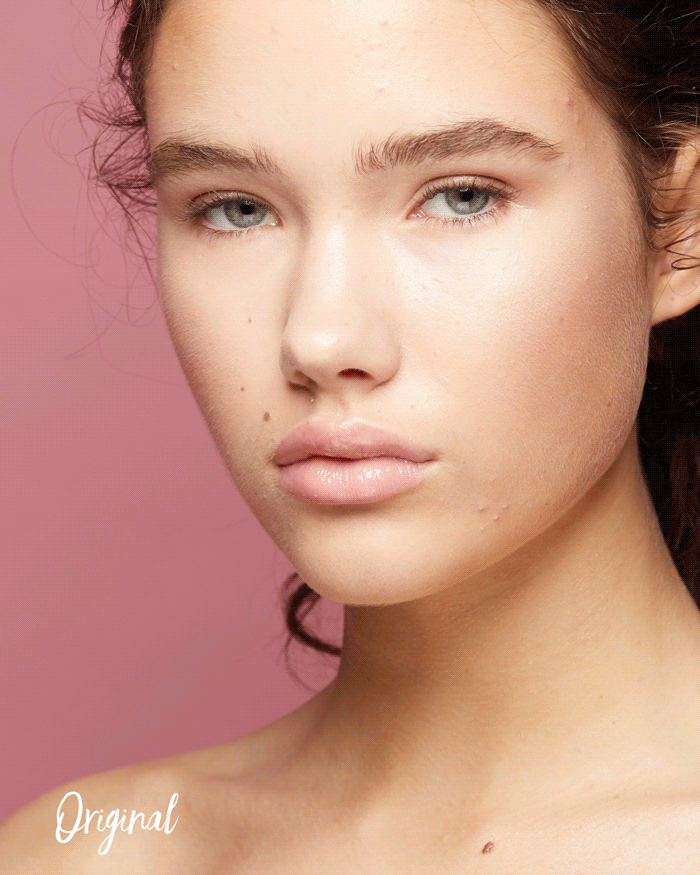
Before/after
Image Credits: Jonas Nordqvist
Original Source: Capture One