Luminosity Masks and making use of Blend If are two phenomenal ways to gain precise control over the tonal range of your image. In general, these tools grant you the ability to make accurate selections for manipulating the dynamic range of a photograph, as well as assigning these values to specific hues for color grading.
Today’s video tutorial by Blake Rudis of f64 Academy offers a comprehensive comparison of the two techniques in Photoshop, packed with demonstrations of how to tackle each method. As an added benefit, you will pick up various shortcuts, as well as a few hidden tricks for better harnessing the utility of layer masks and adjustment layers.
Luminosity Masking
As defined in the video, Luminosity Masking is a snapshot of a selection, because it is a selection that does not change and remains static. Luminosity Masks will appropriately target highlights, mid-tones, and shadows, for value-specific manipulation.

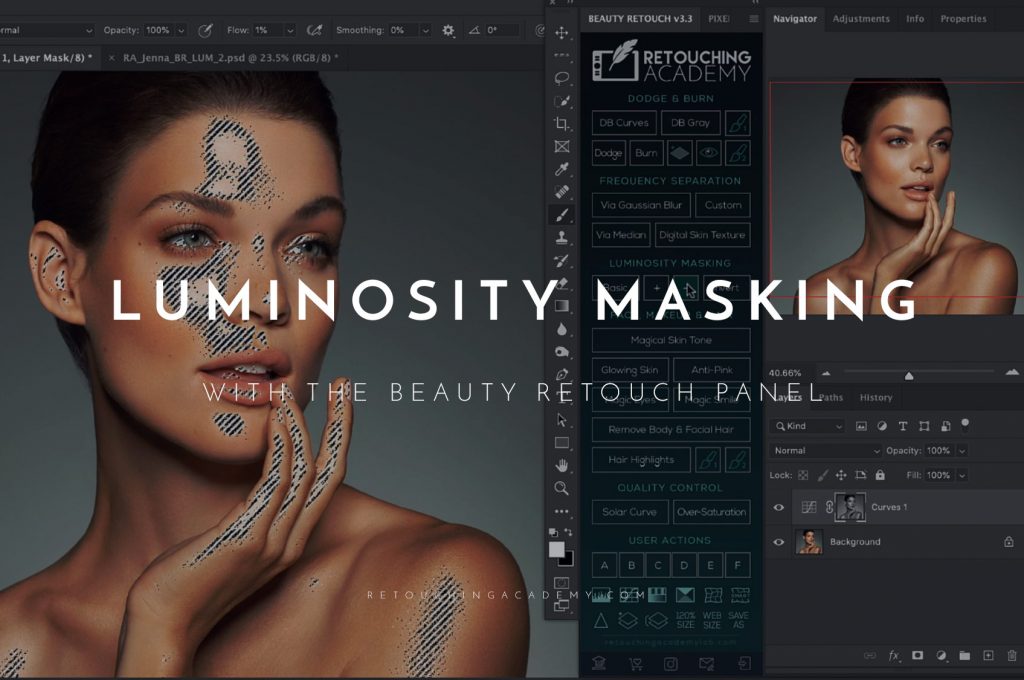
A Luminosity Mask applied using the Retouching Academy Beauty Retouch Panel
If you are retouching with a Beauty Retouch panel, you can use the Luminosity Masking buttons as you follow along with the tutorial. You can also check out our own Luminosity Masking video tutorial for the RA Panels users here.
Using a Curves Adjustment Layer for each Luminosity Mask, you will be able to modify exposure, as well as assign hues to specific tonal ranges with Curves Color Channels.
Blend If
Blend If is a hybrid selection that may change based on the layer that is beneath the working layer, focusing in on tones, and can be more dynamic as a result. The Blend If Sliders are an option found within Layer Styles, which can be accessed through Layer > Layer Style > Blending Options, or by double-clicking on the layer within the Layer Palette.
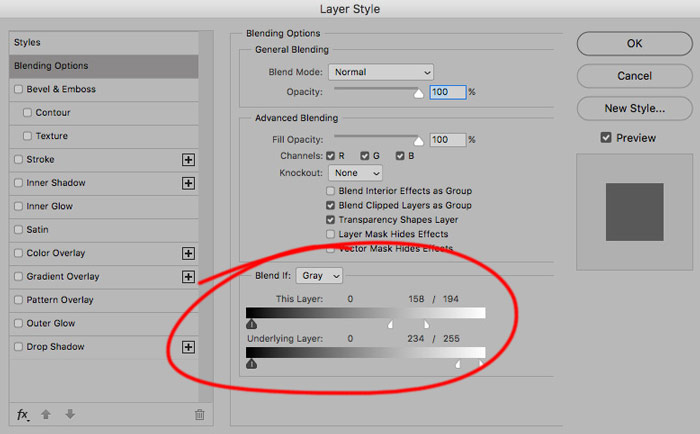
Blend If Sliders with feathering applied.
As you move the sliders for your desired range of effect, you will notice some artifacts or jagged edges. This can be easily resolved by holding down Alt / Option and clicking on the Blend If Slider to allow you to feather that adjustment (white sliders on the right in the screenshot above). This will produce a much more pleasing transition, so your changes can work seamlessly within the photograph.
Source: f64 Academy | Featured Image: Shutterstock