
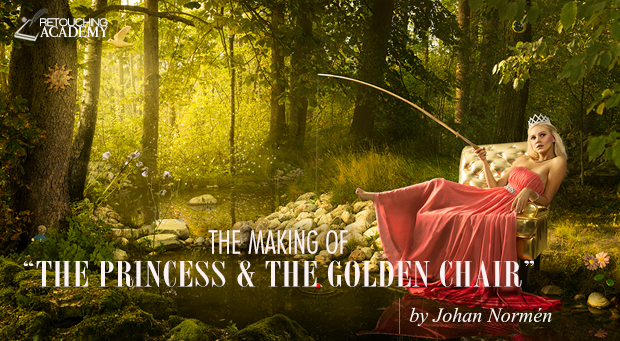
In this post our Guest Artist photographer & master photoshopper (who is a full-time consultant and a team leader at an e-commerce company by day) Johan Normén from Alingsås, Sweden will show us the entire process of his “Princess and the golden chair” image creation.
I personally think the attention to detail in his work is amazing, as well as his workflow structure and execution. Check it out, and let him know what you think in the comments below!
– Julia Kuzmenko McKim
My Beginnings
I love photo montage. Creating environments, which do not exist in reality, and combining them with photography. It all started for me at age 12, when I was a big fan of the Star Wars and Indiana Jones movies special effects. I also loved computer games such as Monkey Island.
I started my carrier at 13 painting graphics in Deluxe Paint (video game designing software) on Amiga (an old digital graphics computer) for my first adventure video game ever. It never got released, but my creative workflow was formed then and I still follow the same routine when creating my composites today.
I have been working in Photoshop since its 2.5 version, mostly creating graphics for websites and some advertising work. I have always followed the same steps when creating images from scratch.
Here they are:
- Sketch the idea.
- Create the background with my own photos.
- Analyze and plan the lighting for additional photography: main light, fill lights, accent lights, etc.
- Photograph additional necessary images with models, using the pre-planned setup in the studio.
- Combine the images of the background with the new images of the models I shot. Perform beauty retouch on the models.
- Adjust and match the colors, and fine-tune the final composition of all the elements.
My Story of “The Princess & The Golden Chair” Image
The Idea
The idea was born when I saw this golden chair in my office.
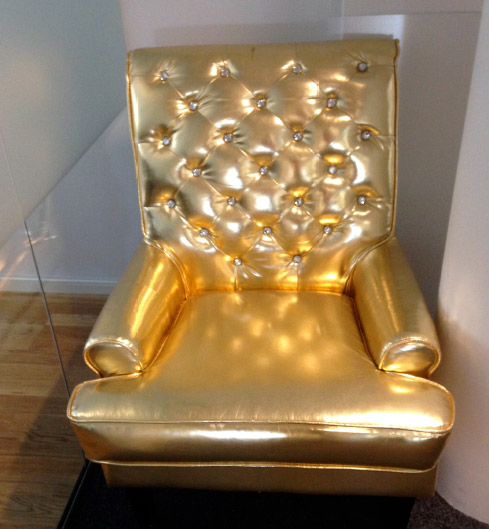
I really loved that chair – I still do – and I realized right then that I needed to incorporate it into a photo shoot of some kind. So, I started thinking what I could use it for. I came to think of gold and diamonds, royalty… and that was what brought me to an idea of a princess.
I also think I came up with the princess idea, because I saw some Annie Leibovitz’s images for Disney a week before that. I am not sure if that was the reason, but regardless, the idea was born. I think Annie’s Disney images definitely triggered my inspiration.
Inspiration is the most important part of the equation, which will lead you to success when creating composites. And while there are no rules as to how to document your creative process, but I would suggest using Google Images (or other online sources) to look up reference photos for the key words that you come up with for your idea.
The key words that I had in mind were gold, diamonds, princesses and water. It was summer time, so I also imagined forest and trees. I spent some time Googling my keywords to get ideas of clothes, and also see if anything in these lines has already been created. Gladly, I found no images like what I had envisioned.
Then I thought about what was typical for a princess. And also what was typical for me personally. A princess could be a cute spoiled lady. As for me personally, I’d always walked my own way, never listened to what I was told I could and couldn’t do, so if I was that princess in a forest, I would certainly do things that an ordinary princess wouldn’t be doing.
For example, she would go fishing and get her dress and nails dirty. I think this is a common idea – a princess often gets bored of being just a princess, and starts doing things she is not supposed to. So, that was my goal and my idea – create a mischievous princess who is busy doing something she shouldn’t be doing.
CREATIVE PROCESS: THE MAKING OF
1. Sketching My Idea
I started sketching my ideas. I usually start with a pre-sketch to figure out the compositions and overall framing. It doesn’t have to be neat and perfect at this point:
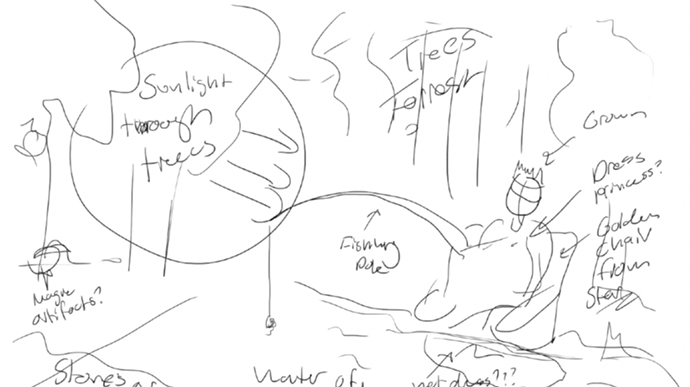
Johan Normén, “The Princess & The Golden Chair” pre-sketch
2. Creating The Background
I went out for a walk with my camera to find and capture the background I imagined. I was looking for a lake or something, in a forest.
I like it when the sun is low in the sky (morning or evening), as it’s not too bright and creates nice soft shadows.
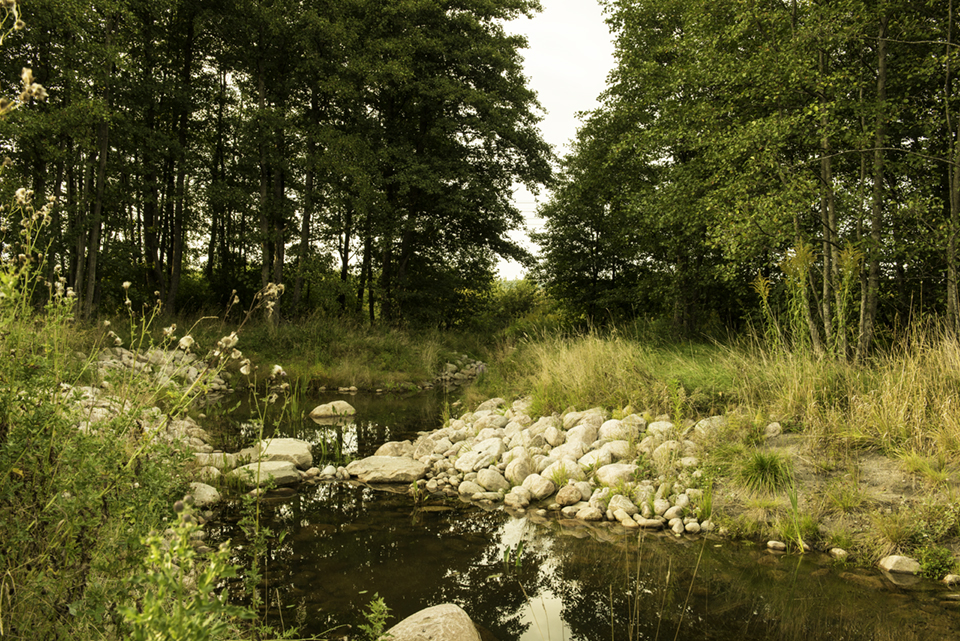
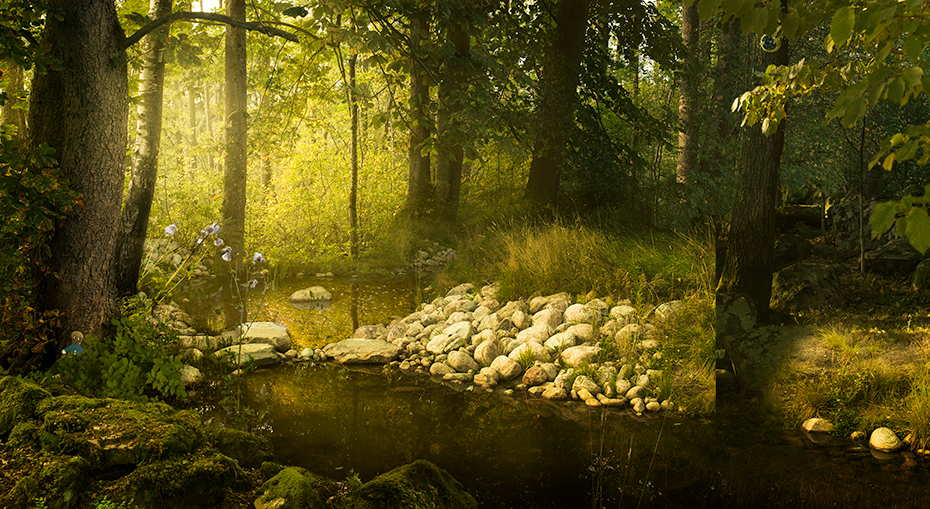
I wasn’t too happy with the trees in the background in that particular place. I did not want it to look like an ordinary lake in a forest. I wanted it to feel magical. So, I wandered to an old forest and found a spot where the sun rays were shining through the frees.
I also found a swamp and took some pictures of it as well. And then happily walked back home to create my background in Photoshop. I usually create backgrounds for my composites before I photograph the models, so I know better how to place the lights in the studio.
The tools I use to combine my background images in Photoshop are mostly just Layer Masks and the Blend If function.
I used the image of the lake as the foreground, the image of the forest was my bottom layer (the background) and I simply masked out the lake layer. You can see this process in my Making Of video above.
I also added some old-looking rocks in the background to make the forest look more distant, old and mystical.
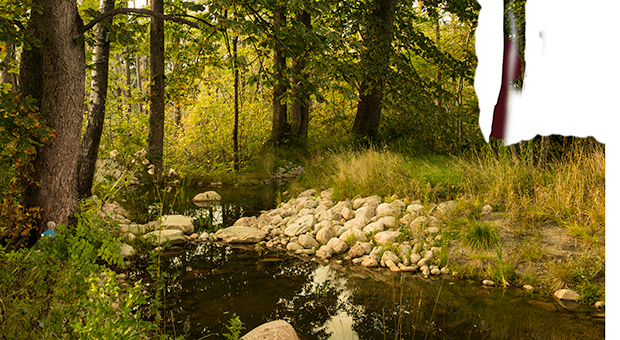
Here is the final background that I created created, before any light effects were added. And you can also see the structure of my PSD file – my Layers in Photoshop. I am bad with naming my layers, though.
Again, I only used Layer Masks and sometimes the Blend If function to prep this background.
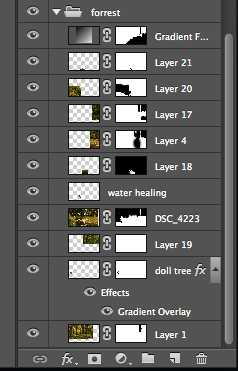
After the background was put together, I darkened some shadows to add more volume to the image and minimize the negative space. I also brightened the background a bit.
I used a Curves Adjustment layers and masked out what I wanted to brighten and darken.
As you can see it’s not perfect, and it doesn’t need to be at this point – I only needed it to analyze and plan the lights for my studio shoot.
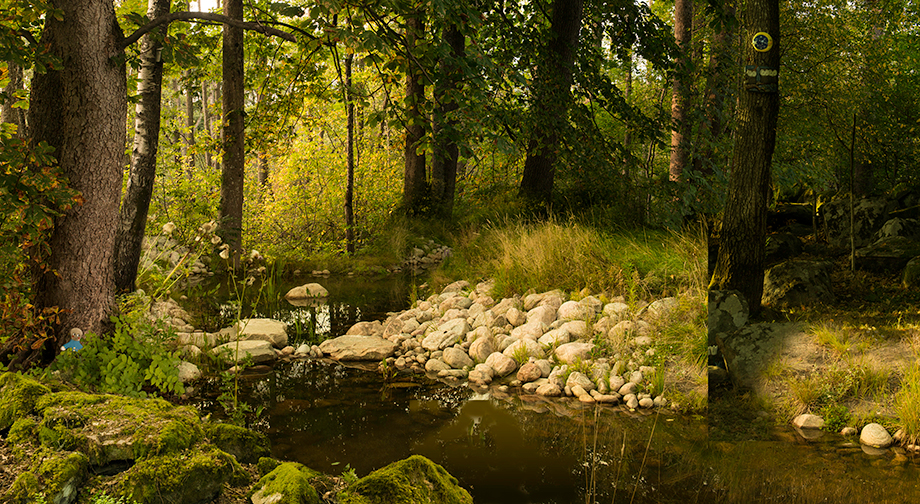
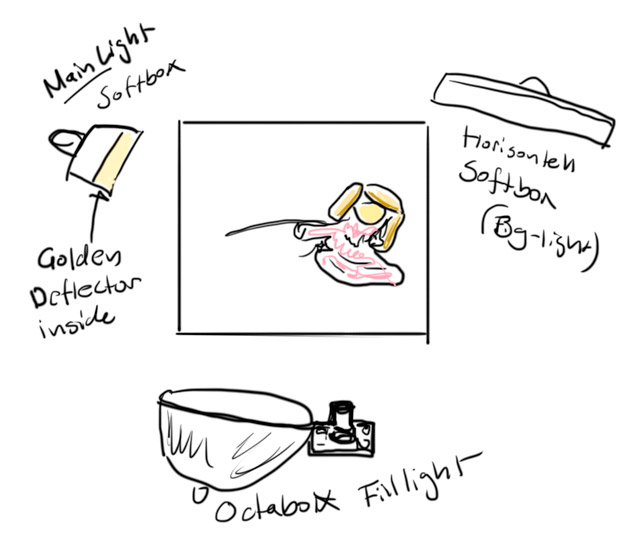
3. The Lights
Analyzing & planning the main light, fill light and accent lights.
As you can see, there are light rays coming from the left corner of the image to the right. And if I add an object into this environment it will also reflect some sunlight back onto the rocks, trees and water. That reflected light’s direction will be opposite to the main light’s direction and will have a cooler color temperature.
Once I figured out the light structure of the future image, I called Ida, my makeup artist, and Emelie, my model, and we went to the studio.
4. Shooting At The Studio
Creating images of the Princess to add into the forest.
I set up the main light (the sunlight in the picture) on the left side of the model in the chair. I used a golden deflector in the softbox to get a light of a warmer color.
I also added another soft white light behind the model. This light source would represent the diffused light coming from the foliage behind our Princess.
The light in the foreground (besides the sun rays) is very diffused, warm and soft, so my last touch was an octabox in front of the model to add fill light and soften the shadows.
Here is a snapshot of my studio setup. I added one light at a time, so I could take test shots and get each one right.
Click on the image to enlarge:
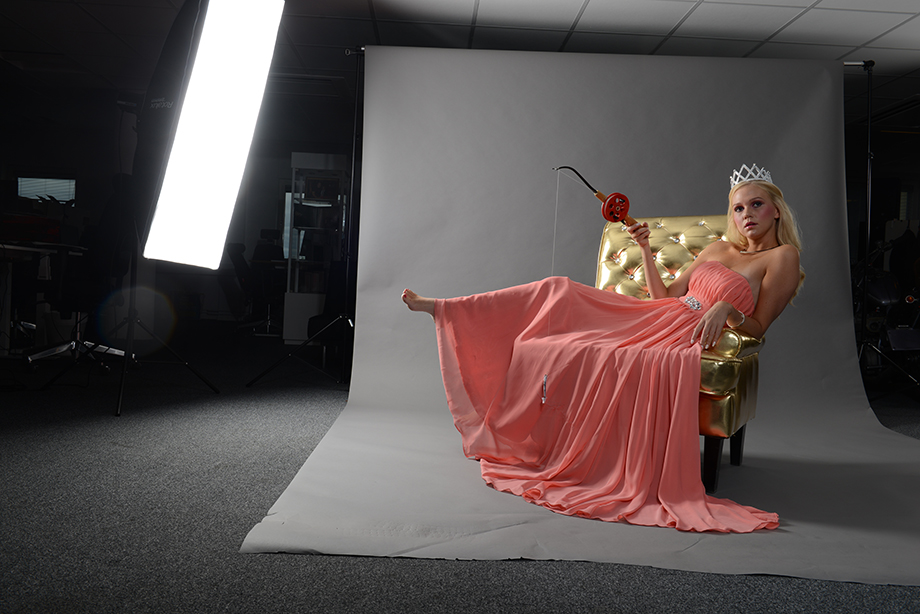
I often tether into my laptop when shooting, so I can get a closer look of the images, correct any possible mistakes, take fewer shots and work more with the model, getting the poses and facial expressions we need for the final image.
We kept shooting for about 40-60 pictures to make sure we got the right images, and then I went home to finalize my image.
5. Creating The Final Image
Placing the model’s images into the background + beauty retouch on the model.
I extracted an image of the model from one of the studio shots and placed her into my main shot with the background. At this point, I fine-tuned the lighting even further now that the main subject was in the shot.
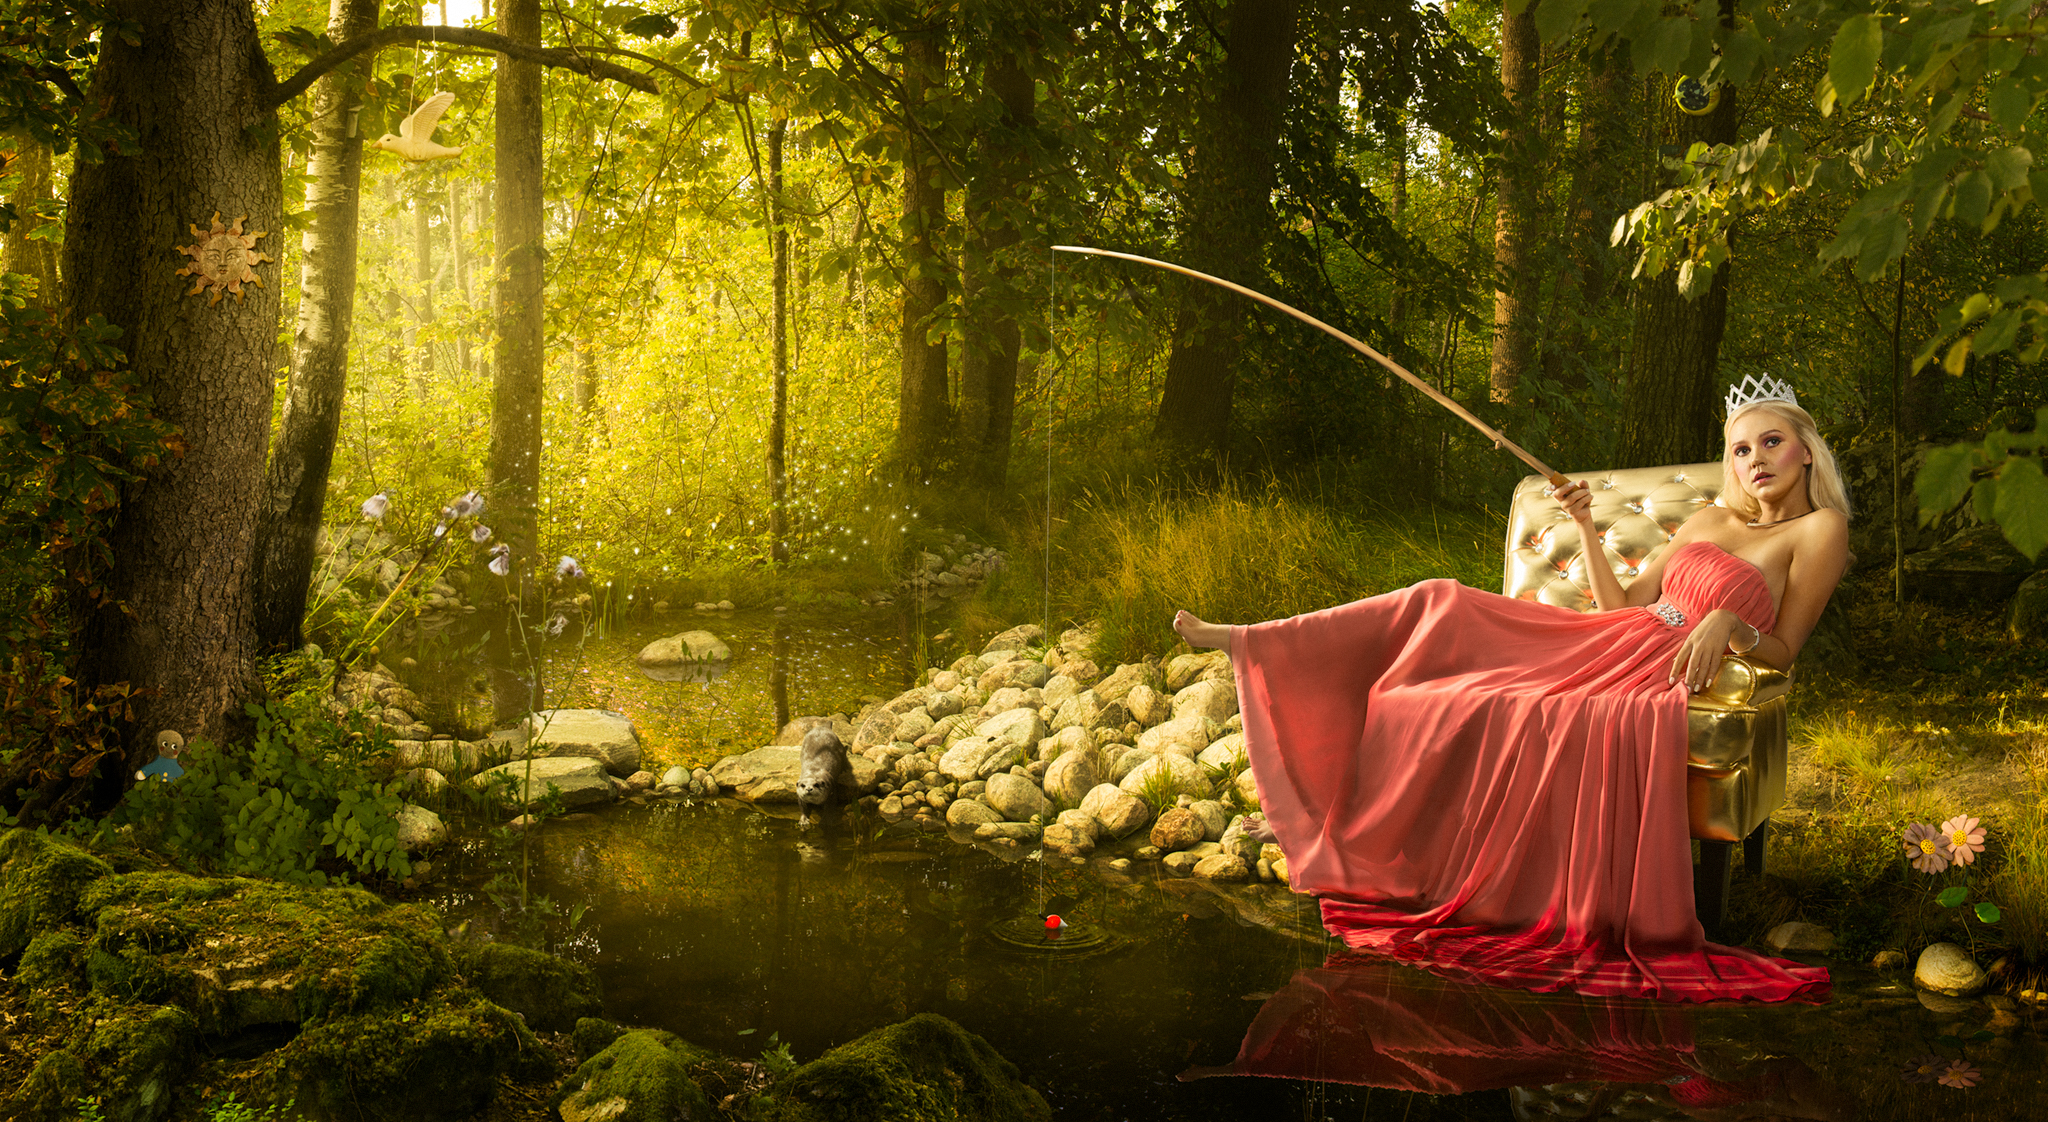
I increased the sunlight and added some interesting symbols to the trees – I had found and photographed them during my walk in the forest. Somebody created those figures and put them up on the trees. I thought that could be a pretty interesting detail and injected that accidental find into my artwork as well.

I had added some of those figures into my final image:
Click on the image to enlarge:
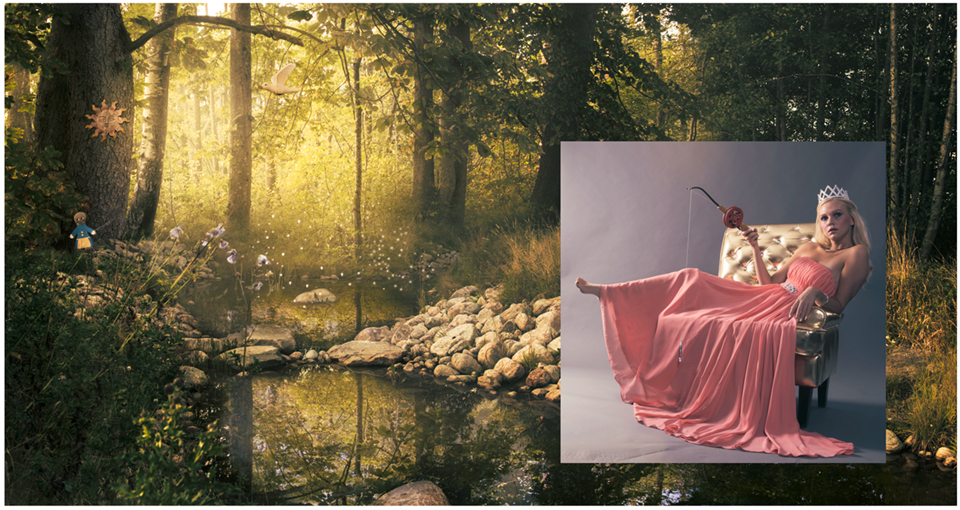
While I was extracting her from the studio shot, I found that I did not like the fishing equipment that was in the shot, so I removed it.
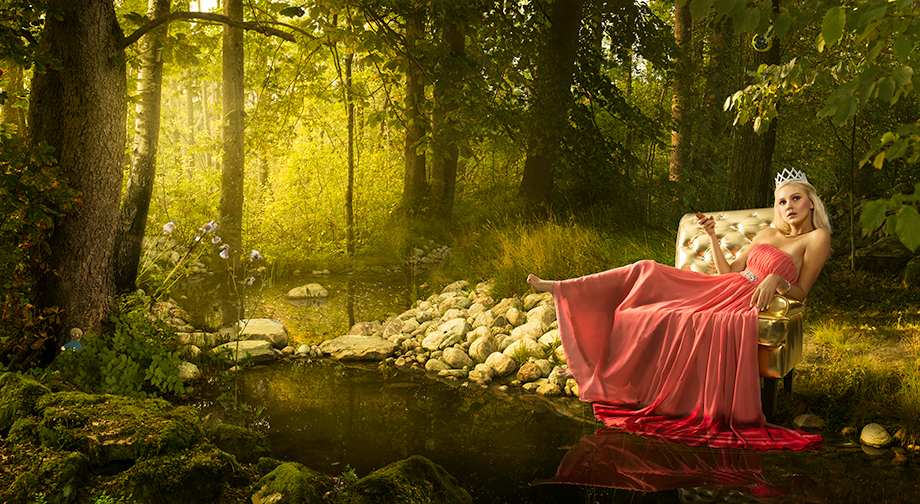
As you also can see, I was playing with the colors, adjusting and changing them slightly, so I could see what kind of final color scheme I wanted for the image overall. I always color grade my images after the main work is done.
I also made the dress look wet, and it wasn’t as easy as it may look. I used two Curve Adjustment layers, pulled each Curve down in different amounts and masked out the parts of the dress I wanted to darken. You can see this step in my video above.
Click on the image to enlarge:
I then added some fireflies, reflections in the water, all the figures on the trees, a new fishing pole and a little animal (almost in the center of the image) and its reflection at this point.
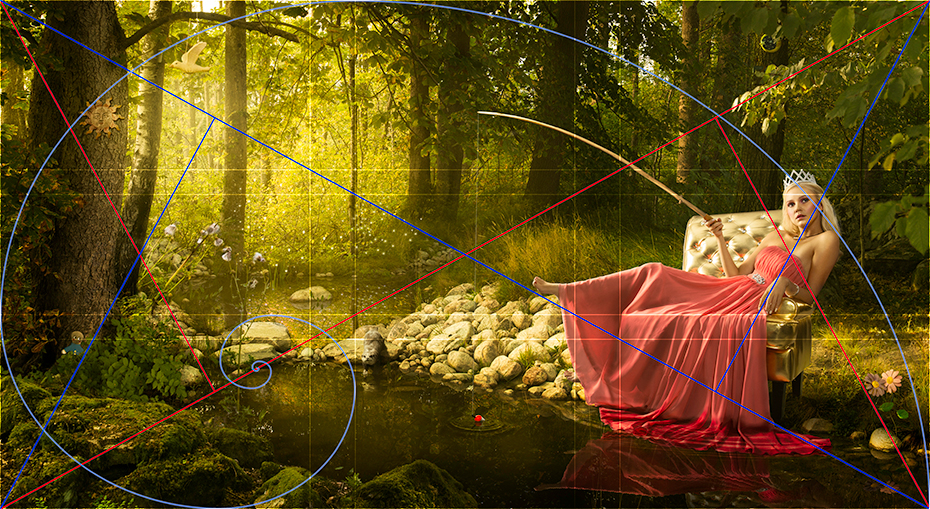
6. Fine-Tuning The Details & Composition Check
Adjusting the colors and cropping the final composition with all the new elements.
I always do a composition check, using the Golden Ratio Rule to make sure I´ve got a visually pleasing placement of all the main lines and objects in the image. I want the artwork’s composition to be visually interesting to follow the story I am trying to tell with my image.
Here you can see that I added the Princess within the point of visual interest (The Golden Ratio). You can also notice that I added a new tree branch in the foreground above the Princess’s head and lined it up with other important compositional lines of the image.
Check out the final artwork here.
Click on the image to enlarge:
I hope you enjoyed my story, feel free to stop by my Facebook page and say Hello!
About Johan Normén
Photographer & retoucher from Sweden near Gothenburg, available for commissioned advertising and marketing projects.
You can see more of Johan’s work and follow him on his:
Facebook: www.facebook.com/JohanErikNormenPhotography
500px: 500px.com/jnormen
Website: www.johannormen.com


Wow!! A huge thank you for this walk-through. this turned out simply amazing!!
Great post Johan! Good to have you on the RA team.
Thanx Michael 🙂 Glad to be a part of it.
Really awesome! thanks for sharing your knowledge.
Amazing. Great inspiration. Thank you.
I am asking myself, who is funded this project. Normén did this just for fun? Will this Artwork be sold as a canvas? – Great work, anyway!
Yes I did it just for fun. TFP job for my Portfolio.
if his goal was to make a perfect picture..he can make a done behind that!!!
Absolutly perfect!